Saturday, July 4, 2020

Barre for everyone (total body workout)

This is a barre workout that anyone can do, using only a pair of dumbbells. It’s a great bodyweight endurance workout to strengthen muscles, burn fat, and challenge your body in an entirely different way.  

Hi friends! How are ya? Hope you’re enjoying the morning so far. Today I have a podcast interview, am lifting some weights (arms from Lean Machine) and spending the rest of the day outside with the girls. I’d love to hear what you have going on!

For today’s workout, I have a new barre workout for ya. I have to admit, it was so much fun (and kind of ridiculous) taking these pics on the gorgeous steps at La Encantada.

Barre for everyone total body workout

(Wearing Fabletics tights and lululemon tank)

This workout combines some of my favorite classic barre moves with endurance strength work using light dumbbells. The dumbbells may look small at first, but I promise that they burn after verrryyy quickly. (As always, check with a doctor before making any fitness changes. Honor your body and modify if needed. Barre works well for many populations, but isn’t always a great option for those who have knee or hip considerations.)

Here’s what the workout looks like:

Barre for everyone total body strength workout

Form cues and tips:

Barre for everyone workout:

Lunge left with pulse: for your lunge, make sure to watch your front knee and keep it stacked right over your front ankle. Come down to your lowest point and pulse here.

Lunge leg lift: next, you’ll move into full range lunges with a leg lift. Squeeze your glutes to lift your leg, and keep your core tight and toe pointed.

Hip extension pulse: hold your leg high and start to pulse at the highest point, squeezing your glutes to lift your leg. (Think about using glute strength instead of momentum.)

Extension

Tiny toe circles: hold your leg high and draw a circle with your toe- 20 circles in each direction.

Side leg lift pulses: open to the side, keep your core engaged, and flex your foot. From here, pulse up 20 times.

Plie squat with heels lifted: find your lowest point and make sure to keep your hips tucked under and your shoulders back and down.

Flare: hold your knees wide and then “flare” — pushing your knees open. (Make sure you’re engaging your glutes to move your legs.)

Flare copy

Hold: hold your lowest point! Keep your heels high and find your lowest, shaky point.

Strength Endurance:

Chest press: Hold the weights at 90 degrees. Squeeze your chest to bring the weights in, open back up, then press the weights overhead.

90 degree pulses: Hold the weights at 90 degrees and pulse up.

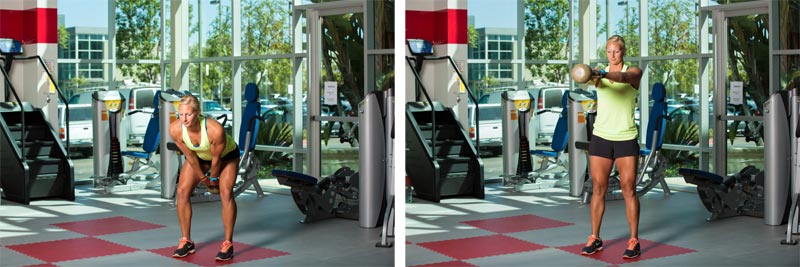
Plie squat and overhead reach: Come into a plie squat and use your back muscles to squeeze the weights behind you. Rise from your squat (squeeze your quads) and press the weights up overhead.

Gina Harney Favorites 0036

Triceps extension: Hinge forward from your hips and keep your core pulled in. Squeeze the weights in, bringing your arms close to your torso, then extend your arms behind you. Think about really squeezing the backs on your arms as you extend. Complete full range extensions, 20 pulses at the top, and then hold for 20 seconds at your highest, straightest point.


Cardio Barre Workout

The cardio barre workout will get your heart rate up and burn serious calories. You can do this workout at home or at the gym! All you need is your own bodyweight and a timer.

Hey friends! How are you? I hope you’re having a great morning so far. Today, I’m doing a couple of fitness consultation calls (wahoo!), putting the finishing touches on tomorrow’s podcast episode, and catching a strength workout at the gym. Lately, I’ve been focused on adding strength variety to my routine: heavy lower rep work at Telos, moderate rep and intensity at Orangetheory, and low weight, higher rep endurance work through BODYPUMP, Peloton, and Barre.

Mtn climber

I found that I get the most benefits from my efforts when I include a mix of traditional hypertrophy work and endurance work. My muscles look and feel different, and it always keeps me challenged! (You can read more about the difference between traditional strength and endurance here.) As you guys know, I’m a huge fan of barre, but one of the top complains I hear about barre is that it doesn’t include very much cardio. Participants often like to go to classes for a calorie burn, and with barre, it can be fairly low. (The good news is that when you take a class, you FEEL it working, so it must be magical even though my Apple Watch doesn’t give it enough credit.) Many barre classes and studios have incorporated more variety in their classes, whether it’s through core and cardio-focused classes, or fusion classes that include spin bikes or Pilates reformers. I like it all. 😉 

My Other Videos

If you’re looking for a barre workout that will get your heart rate up, I got you, boo. This one includes some of my very favorite heart-pumping barre intervals. You can also keep the moves low impact by eliminating any of the jumps. You’ll still get an awesome workout!

Here’s what the Cardio Barre Workout looks like:

Cardio barre workout you can do at home! All you need is your own bodyweight and a timer to get in an awesome calorie-blasting workout.  fitnessista.com

Form cues and tips:

Marches: March in place, using your core to lift your legs and exhaling as each leg rises. Pull your arms down with each march, engaging your lats. The goal is to get your legs as high as your hip bones, as straight as possible, and toes pointed. 

Cardio barre workout you can do at home! All you need is your own bodyweight and a timer to get in an awesome calorie-blasting workout.  fitnessista.com

Low plie squat pulse: For this squat variation, you’ll take a SUPER wide stance and turn your toes out. As you sink down, keep your chest lifted and endeavor to get your thighs parallel to the floor. Make sure your knees extend towards your toes but not past your toes. Hold your squat here, with arms extended out to the sides, and pulse up two inches and down two inches the entire time.

Rotating squat jumps: Start facing one side and sink low into a squat. Jump 180 degrees, and land with a soft knee to squat on the opposite side. To minimize impact, walk 180 degrees to squat on the other side.

Mountain climbers: Get in plank position with your wrists under your shoulders. Bring one knee towards the elbow on the same side. Move back to plank and switch to the opposite side. For more of a challenge, move as quickly as possible.

Plie squat burpees: Sit into your plie squat and bring both hands to the floor, firmly planting your entire hand. Walk or hop back to a plank position (push-up here optional), walk or hop your feet back to your hands, and jump vertically, raising your arms overhead.

Cardio barre workout you can do at home! All you need is your own bodyweight and a timer to get in an awesome calorie-blasting workout.  fitnessista.com

Touch the floor and passé: Stand with legs hip-width apart, bend at the hips to touch the floor as one leg lifts up behind you. Return to standing, bending the knee and driving it forward. Repeat all reps on one side before switching.

Plie squat jumps: Get into a plie squat position (feet wide and booty LOW), and touch the floor. Keep your abs engaged and chest lifted. Powering through your heels, spring up, reaching your arms towards the ceiling. Land with a soft knee. Repeat.

Cardio barre workout you can do at home! All you need is your own bodyweight and a timer to get in an awesome calorie-blasting workout.  fitnessista.com

Side lunge to passé: Try to keep your chest lifted and core tight as you perform the exercise. Aim for some dynamics and height change with your movements, as this will make the exercise even more challenging. As you rise from the side lunge, bring that leg to a bend position with arms in front. Spring up from your bottom leg and land softly.

5 Ways to Reduce Muscle Soreness FAST

Okay, can we talk about having muscle soreness after a workout for a minute? I have a love-hate thing here. On the one hand, I love being sore after a good, hard workout like this one with booty bands or this one (sooo good!) It’s super satisfying to literally feel my muscles building themselves.

On the other, I get bummed when I’m so sore that getting my sweat on sounds extra hard. I’m definitely all for working out through some slight soreness, especially if you’re targeting a different muscle group. But sometimes, the extra ache can be enough to make me want to slow my roll.

But it’s swimsuit season, babes! And you’ve all worked so hard to make so much progress. A little muscle soreness after a workout should never stand in our way. So here are my top five fave ways to reduce muscle soreness — and fast!

#1: Give yourself a massage

There’s just something about a massage, right? It feels soooo good. But I’ve always hated self-massage because it’s just not as relaxing. Or, at least, I used to — until I found something super cool. 

muscle soreness after a workout

You guys! I cannot say enough about the Wahl Lithium-Ion Cordless Deep Tissue Massager

For starters, this thing is so versatile and easy-to-use. It’s cordless, so I can give my sore muscles some love anywhere I want, like chilling on the couch. And it’s got four different attachment heads and variable intensity so you can really target muscle groups with what they need. Plus, the long handle and the spine attachment are a GAME CHANGER for sore back muscles.

Seriously, if you’re looking for a way to treat yourself, this massager is it

#2: Do some relaxed stretching 

Full body stretching

If your muscles are sore, they’re crying out for some TLC. And you can give it to them in the form of stretching. This is a great way to move your body on rest days. 

I’ve got some stretching routines you can follow. This one gives you a full-body stretch, while this one is awesome for relaxing your body and your mind. Plus, there are TONS of amazing stretching videos for you in the LSF App!

I’d also encourage you to explore what your body needs. If one particular area is sore, try different stretches until you find what gives you relief. Listening to your body like this is a great way to give it the love and attention it needs. 

#3: Ice, ice, baby

Muscle soreness is one thing. It’s a sign your muscles are rebuilding. But if you notice any inflammation — or swelling — it’s a sign you’ve gone too hard. Take it easy on that area, for sure.

And to bring any inflammation down, ice the area. I know ice can feel pretty intense. I recommend wrapping your ice pack in a tea towel to ease yourself in. Because, seriously, ice can be a huge part of treating a wide range of injuries

#4: Heat it up

Ice is great if you’ve strained yourself too much. But heat is ideal if you want to support your muscles in their normal recovery period — plus it feels good!

When you apply heat, whether you use a heating pad or take a hot bath, you cause blood vessels in the area to dilate. This improves blood flow, which helps bring a flood of nutrients and oxygen to the area. In short, heat’s a great tool to help yourself ease soreness and support recovery. 

#5: Plan your meals wisely

katie cooking

You already know that what you put into your body fuels it. So don’t forget that mealtime can be a powerful tool to help yourself get past muscle soreness after a workout faster. Include lots of anti-inflammatory foods in your meals and snacks when you’re feeling achy. 

Also, don’t forget to drink plenty of water with and between meals. When you’re dehydrated, muscle soreness is more painful. Drinking lots of water helps to flush toxins so you can feel 100% faster.

Don’t let soreness stop you, babe! Use these tips to keep on your grind, pain-free!

FULL BODY BAND WORKOUT

You’ll find 3 more strength based exercises with 1 more plyometric exercise in each circuit. Grab your bands and sweat it out! Find more workouts just like this plus bonus sweats and videos in the LSF App and try out these booty moves for your next workout to build that peach!

Need some post workout fuel? Try out this delish Instapot Chicken Tacos recipe for dinner tonight!

Complete each circuit 2 times.

CIRCUIT 1

Sumo Squat x15

Start with the band around your thighs just above your knees. Place your feet wider than hip distance and your heels facing in and your toes pointed slightly out. Keep your body weight in your heels with your chest lifted and core tight. Sit your hips back and down as you lower into a “seated” position. Pushing into the band,  bring your hips down in line with your knees. Push through your heels and squeeze your glutes to come back to standing. Repeat.

Pull Downs x10 each side

Start by holding the bands in both hands overhead. Pull your shoulders back and down, tuck your pelvis, and engage your core. Exhale and pull down on the right side, driving your elbow down and squeezing your shoulder blades together. Inhale and you return to the starting position and do the same on the left. Repeat. 

Russian Twists x30

Begin in a side forearm plank with shoulders stacked over the elbow and resistance band around the thighs just about the knees. Engage your core and drive your upper knee toward your chest as you reach your arm and pull your elbow to meet the knee in the middle. Repeat. 

Frog Hops x15

Start in a sumo squat position with the band around your thighs and hands on the floor. Explode, jumping up with hands overhead, and land softly back in your squat. Repeat, moving as quickly as possible.

CIRCUIT 2


Clams x16 each side

Come onto your side with your knees bent and the band around your thighs.  Keep your ankles together as you press into the band to open your knees working your abductors. Slowly close with control and repeat. 

Bicep Curls x12 each side

Start with the band in both hands and your feet hip distance apart. Keep your body weight in your heels and a slight bend in your knees.. With straight arms, bring your hands together in front of you. Start with your right hand facing away from your body and your left facing your thigh. Engage your right side and curl the band up toward your shoulder. Squeeze at the top and slowly lower with control. Repeat this same movement on the left and alternating sides.

Single Arm Row x12 each side

Start with the band in both hands and your feet hip distance apart. Keep your body weight in your heels and hinge forward slightly. With straight arms, bring your hands together in front of you. Then with your palms facing each other, pull your right elbow back keeping it close to your body. Squeeze the shoulder blades together, pause and return to starting position. Repeat.

Mountain Climbers x40

Start in a full plank position with the band around your thighs, just above your knees. Drive your right knee toward your left elbow then step back to starting. Repeat with your left knee to right elbow and try to move from left to right as quickly as possible

CIRCUIT 3

Dead Lifts x15

Start with the band around the bottom of your feet, feet hip distance apart. Bend into your knees and hinge forward with a flat back to gather the band in your hands. Engage your glutes as you lift to standing squeezing your glutes and hamstrings at the top. Note: you will not likely be able to return to full upright position with the band in hands. Keep a bend in your knees and remain slightly hinged at the top depending on the band you use. 

Tricep Kickbacks x12 each side

Start with your band in both hands and  your feet hip distance apart. Keep your body weight in your heels and hinge forward slightly. Place your left hand with the band onto your right hip. Drive the elbow of your right arm toward the sky, keep your right hand on your hip.. Keep your upper arm stable as you press your band back and up to straighten your arm. Bend to lower the bandt to your hip and try not to go past your hip! Repeat.

Bicycles x40

Lay on your back with the band around your thighs and just above your knees. Bring your hands gently behind your head with your elbows out wide. Bend your knees to a 90 degree angle and engage your core. Lift your shoulders off the mat and extend your left leg out long to hover as you twist your right elbow to your left knee. Switch sides and continue alternating right to left.

Plank to squat x12

Start in full plank position with band around your thighs and legs slightly wider than hip-width apart. Hop your feet toward your hands. When your feet reach your hands, bring your weight into your heels and continue to press into the band. Lift your chest to lift into a squat position. Plank your hands back down, hop your feet back and repeat

10 Minute Fat Burning Workout for Beginners

Want more daily workouts and real time exercise videos? Check out LSF the App! The LSF App has a variety of workouts for beginners as well as workouts that are a little more challenging. Download it now!

Complete each circuit 1x and take breaks as you need them. As you begin to feel stronger, add more reps to your exercises! 

CIRCUIT 1

Bridge Hip Lift x12 

Targets glutes + hamstrings

·      Lie on your back with knees bent and feet hip distance apart

·      Press heels into the floor

·      Tuck your pelvis and press hips up towards the sky

·      Be sure your glutes stayif engaged as you lift up and the lower back down

·      Hover an inch or two over the floor as you come down, and then lift up to repeat

Super Women x8

Strengthens your back and works core

·      Start on your stomach with legs long behind you and arms reaching overhead

·      On you exhale lift your arms and legs a few inches off the floor and hold

·      Drive your elbows back, squeezing your shoulder blades together

·      Reach forward again and slowly lower with control. 

Forearm Plank Double Knee Taps x12

Works entire core and targets lower abdominal muscles 

·      Start in forearm plank position

·      Step back onto your toes, keeping your pelvis tucked and hips low to the ground

·      Keeping your core engaged, lower both knees (at the same time!) to hover just one inch above the floor

·      Make sure you try not to raise your hips as you lift and lower your knees

·      Push through your heels to straight legs and then repeat

Squat x15

Strengthens lower body (quads, hamstrings, glutes, calves) and also your core. Lower body exercises also help increase calorie burn!

·      Stand with feet hip-width apart and toes slightly pointed out

·      Bend your knees and squat down as if sitting back in a chair

·      As you lower down, raise your arms in front of you and keep your core tight

·      After pausing in the squat, return to standing

·      Squeeze your glutes at the top and lower your arms, then repeat

CIRCUIT 2

Push-Up on Knees x8

Strengthens your upper body and targets your pectoral muscles, triceps, and shoulders,

·      Start in full plank position

·      Drop your knees to the floor and hands under shoulders

·      Exhale and slowly lower down to the floor, making sure your arms and elbows stay by your sides

·      When you have gone as far down as you can go, exhale and press back up

·      Repeat lowering and pushing back up

Bent Knee Heel Taps x15

Strengthens your pelvic floor and lower abdominal muscles.

·      Lie on your back with knees and hips bent 90 degrees and toes pointed

·      Extend your arms out to your sides and press lower back into floor

·      Exhale and tap your right heel on the ground

·      Inhale and bring your right leg back to start then tap left heel down

·      Repeat this movement alternating legs

Reverse Lunges x12

Strengthens your core, hamstrings, and glutes. I prefer them because they put less stress on your joints.

·      Stand up straight, gaze forward, chest lifted, and core engaged

·      Step your right leg back and lower your hips

·      Bend your left front leg to a 90-degree angle, keeping your left knee over your left ankle

·      Hold in your lunge and then push through your left heel to stand

·      Bring your right back leg to meet the front and then repeat

Tricep Dip x6

Strengthens and helps isolate the tricep muscles (think bat wings!)

·      Sit on the floor

·      Keep your arms straight behind you and raise your hips

·      Bend your elbows to lower yourself down to the floor until elbows are at a 90-degree angle

·      Press into your palms to straighten arms and come back to starting position

·      Repeat movement

Best Running Underwear for Women and Men

Best Running Underwear for Women and Men

Commando or underwear – this may have been the most commented post I’ve ever put up on Instagram. It turns out that running underwear was a hot topic!

Whether you’re looking for bun huggers, women’s running underwear or running briefs we’re getting ready to dive in and help you find exactly what you need.

Should you wear underwear when running?

If you want to. The results are about 50/50 when asking runners whether they wear underwear or go commando, this applies both to running in leggings and in shorts with a built in liner.

Personally, I couldn’t imagine running in soggy cotton underwear, especially during my time living in Miami. But for others it’s a comfort factor and so if you feel you need them then this post is for you!

  • Ditch the cotton which is a breeding ground for bacteria
  • Wet cotton could be causing body acne
  • Underwear could increase or decrease your potential for chafing, that all depends on what you wear

Best Running Underwear

In complete transparency, I’m of the run commando camp. So I had to ask around for your favorites and agree to test out some when I might not usually choose to wear them…you’re welcome.

We’re going to start with the ladies workout underwear. Many of them are very similar so I won’t do an in depth break down, but instead share notable features about that style.Running Underwear

What is the best underwear for running?

  • Stay away from cotton
  • Look for wicking fabric
  • Comfortable fit (no riding up, thank you very much)
  • Anti-microbial or anti-odor is a big bonus to make them last longer

Exofficio
These came up more than any other brand among trail runners and was one I hadn’t heard of previously, which I actually think is pretty excellent. If they come up without that standard runner brand name they must be good.

I noticed a variety of styles, so you can get your high wasted to your briefs and even your crazy thongs. Sorry, but if you’re choosing the thong I just can’t figure out why you won’t go commando.

New Balance Breathe Hipster Panty
Besides being called a panty, everything else about this bikini style is right on par with what you need. Cheaper than so many of the other running brand names, a variety of colors and sizes, no tags or side seams to worry about and designed to help eliminate odor (a staple I appreciate in all running gear).

✅The NB three pack wins the best value for price award.

Patagonia Active Undearwear
This was another option which came up repeatedly in the suggestions. I’m guessing it’s partly because they make gear that lasts, but also they have a variety of styles from hipster to bikini. Seamless waistband with no tags and quick drying!

Balanced Tech Hipster Brief Seamless
This brand is new to me, but has almost 1400 five star reviews on Amazon and lots of votes for it in the women’s running group I polled. Coming in x-small to x-large, I think it’s also the biggest size range and color offerings.

It’s also the highest nylon count in the listed running underwear, which means it should dry super quick

❎Best for all sizes.

Runderwear
This brand is all about us runners and even offers a women’s boy short and merino briefs, giving you more style options to find exactly what fits you.

They have a chafe-free guarantee, which would be HUGE for me in making a selection. Seamless, breathable and “designed to move with your body”. Hoping that’s their polite way of saying it won’t ride up.

Men’s Running Underwear

All right gentleman, let’s talk! I’ve often chatted about nipple chafing, what a painful thing you have to deal with, but honestly had to sit my husband down for a little talk about ummm this chafing. From him and fellow runners, I collected these general themes:

  • Compression shorts are great under regular running shorts
  • Wicking underwear is also nice, but usually needs to be tight

Under Armour Compression Shorts
These come in both a 6 and 9 inch length, which is useful depending on your height and what you like best. The 9 inch has less chance of ever riding up, but may simply feel too long for some guys.

Duluth Buck Naked Performance Boxer Briefs
Touted as almost feeling like you’re wearing nothing at all these fit the light weight bill, but also have anti-odor technology and let’s be honest it’s a great thing for ALL our running gear.

Running Briefs Bun Huggers

I’ve given these their own section because they aren’t underwear, they’re the whole gear! Nothing covering them up, just like a bikini bottom you’d head to the beach in, they’re ready to be worn.

My friend and a fellow running coach Toni wore these a lot during her summer training and I honestly just wanted to give her mad props every time I saw it. They tend to be seen mostly in track meets or on the elites in marathons, but truly you can use them anytime if you like them.running bunhuggers

Why runners like bunhuggers or briefs?

  • No seams to deal with, less potential issues to slow you down
  • Less fabric when it’s so hot
  • More mobility

The two most common brands I see on runners (not in a team uniform) are Tracksmith and Rabbit.

Now that you’ve got your great runderwear, checkout one of these yearly Underwear Runs to show them off!

Looking for more reviews to find the best things for your run?

Checkout our full page of my must have running gear reviews and guides to save you time searching and money! I share what’s worked for me and fellow runners, along with what wasn’t worth the price tag.

What are Processed Foods: A Guide to Eating Healthier

What do bagged spinach, canned tuna, olive oil, granola bars and frozen burritos have in common? They all are processed foods. Yet, we have been inundated with warnings about the harmful effects of eating processed foods. In fact, these foods have been blamed for our nation’s obesity epidemic, high blood pressure rates and the rise of type 2 diabetes. Based on the examples above, however, you can see that processed foods are more than packaged ramen noodles, potato chips and drive-thru chicken nuggets. This article helps you differentiate between the processed foods you should be cautious of and those that can play a role in a balanced, healthy diet.

What is Processed Food?

According to the Academy of Nutrition and Dietetics, processed foods include any food that has been deliberately changed in some way before consumption. Examples of processing include foods that are cooked, canned, frozen, packaged or changed in nutritional composition through fortification (adding folic acid to bread products or calcium and vitamin D to milk and juices). It also includes foods that are preserved (beef jerky or canned fruit) or prepared in different ways (fermentation).

Processed foods range from minimally to heavily processed, including:

  • Minimally processed foods—such as bagged spring mix lettuce, cut-up vegetables and roasted nuts—are simply pre-prepped for convenience.
  • Foods that are processed at their peak to preserve nutritional quality and freshness and include frozen fruit and vegetables, canned tomatoes and canned tuna.
  • Jarred pasta sauce, salad dressing and cake mixes are examples of foods that contain ingredients such as sweeteners, spices, oils, colors and preservatives, which are added for flavor and texture.
  • Ready-to-eat foods, such as cookies, breakfast cereals, and deli meat, are more heavily processed.
  • The most heavily processed foods on the processed food spectrum are often pre-made meals including frozen pizza and microwaveable dinners.

How to Incorporate the Best Processed Foods Into Your Diet

Processed foods can be helpful and convenient for preparing healthy meals. Unfortunately, most Americans get too many calories from the more heavily processed categories and not enough from lightly processed foods.

The key to consuming the healthiest processed foods is to be able to distinguish between those that have been lightly processed versus those that are heavily processed. Basically, lightly processed foods are ones you can recognize in their original form such as pre-cut apple slices, hard-boiled eggs, canned tuna and frozen vegetables. Those that are highly processed are not in their original form such as potato chips and crackers, or foods that are not naturally occurring such as sodas, cookies and candy. The best way to understand where foods fall along the food-processing spectrum is by understanding the Nutrition Facts Label and ingredient list. This is especially important when looking for hidden sugars, sodium and fats.

Added Sugars

Added sugars are any sugar that is not naturally occurring in the food and has been added manually. For example, milk and dairy have a large amount of lactose, which is a naturally occurring sugar in these products. However, sugars are added to fruited yogurt. Be aware that sugars are added to a wide variety of products including bread, fruit drinks, granola, protein bars, tomato sauce, canned or boxed soups, nut and seed butters, salad dressings, protein powders and sports drinks. When looking at the food label, some examples of names of added sugars are dextrose, fructose, raw sugar, nectar, honey, high-fructose corn syrup, brown sugar, cane sugar and fruit juice concentrate. Read a product’s ingredient list and look for added sugars among the first two or three ingredients. Beginning in July 2018, grams of added sugar will be included in the Nutrition Facts Label.

Sodium

Highly processed foods often have a substantial amount of salt added to preserve foods and extend shelf life. In fact, they are major contributors to sodium in our diets. Therefore, choose foods labeled no salt, low-sodium or reduced-sodium to decrease your sodium consumption. We need some sodium, but we often consume more than the Dietary Guidelines for American’s recommendation of less than 2,300 milligrams per day.

Fats

Added fats can help make foods more shelf-stable and give them texture and taste. While trans fats, which raise bad cholesterol levels and lower good cholesterol levels, are on the decline in processed foods, you still might find them when reading food labels. The Food and Drug Administration banned artificial trans fats from the food supply, but food companies have until 2018 to comply. Look for zero grams of trans fats and no partially hydrogenated oils in the ingredient list.

Below is a list of strategies for choosing processed foods that are good for you:

  1. Frozen vegetables and fruits: If fresh produce is not available or if you often find a “soup” of wilted and spoiled produce at the bottom of your refrigerator drawer, purchase frozen fruits and vegetables instead. Because of the process used to freeze produce (blanched and then quick-frozen), many of the nutrients (vitamins C and E) are the same or even higher in frozen produce as compared to fresh.
  2. Fermented foods: Foods such as yogurt, kimchi, kefir, sauerkraut and tempeh contain probiotics, which may help bolster the immune system and relieve constipation.
  3. Sprouted foods: Whole grains and beans are living seeds, and some processing with the right amount of moisture and temperature can make them sprout. These foods have been found to be easily digestible, have a minimal effect on blood-sugar levels, and contain more protein, fiber, and B vitamins than their non-sprouted counterparts. Look for “sprouted” on the food package.

Clearly, processed foods have a place in our busy lives. Prepackaged fruits and vegetables are a convenient way to eat healthfully. In addition, methods of processing, such as fermentation and sprouting can help us obtain the nutrients we wouldn’t otherwise be consuming.

Pre- and Post-workout Nutrition for High-Intensity Interval Training

High-intensity interval training (HIIT) has become hugely popular thanks to real results in shorter periods of time and extensive benefits. With busy schedules the norm, it’s no wonder so many clients and potential clients are now seeking out these kinds of workouts.

HIIT, which involves repeated sessions of relatively brief, intermittent exercise, usually performed at very high intensity, can easily be modified for various client needs and fitness levels. When combined with an expert nutrition program, personalized HIIT programs can elicit serious results and health benefits, including:

  • Improved blood pressure and cardiovascular health
  • Improved insulin sensitivity
  • Improved body composition 

Whether you’re adding HIIT to your own personal fitness program or ramping up client results and health benefits with this style of training, it’s important to understand the nutritional needs to support it from start to finish. While nutritional needs do vary by individual and training program, these nutrition plans and meal ideas for pre- and post-workout nutrition can help. 

General Nutrition to Support a H.I.I.T. Program

To get the most out of any fitness program, clients should follow a healthy meal plan in general. Effective and well-rounded nutrition programs are based on a variety of healthful ingredients such as whole grains, fruits and vegetables, and lean proteins. The best nutrition plans provide adequate calories and macronutrients such as carbohydrates to fuel the body and provide energy stores for workouts. Adequate water is also a must to ensure complete hydration during workouts. 

Pre-workout Nutrition for HIIT

Due to the intensity of these workouts, it’s vital to follow a healthy nutrition plan with adequate nutrition in the days and hours leading up to a workout. Plan on a moderate- to high-carbohydrate meal that also includes protein approximately three to four hours before the HIIT workout, and then another high-carbohydrate snack within an hour after the workout. Good options for a pre-workout meal include:

  • Whole-wheat toast with peanut butter and banana
  • Non-fat Greek yogurt or cottage cheese with fruit
  • Dried fruit and almonds 

Post-workout Nutrition for HIIT

The biggest nutritional concern post-workout is replacing energy stores (glycogen) and repairing muscles that have been broken down during the intense workout. Again, a combination of carbohydrates and protein has been shown to be most effective. Research shows that a 3:1 ratio of carbohydrates-to-protein within 30 minutes of completing a HIIT workout is best for replacing energy stores in preparation for the next high-intensity workout. Suggestions for post-workout nutrition are similar to pre-workout meals and include:

  • Whole-grain cereal with fruit and soy milk
  • Whole-wheat crackers with fruit and cheese
  • Hummus and pita bread 

The best pre- and post-workout nutrition boosts energy and results—and client motivation. Help clients to achieve the results they demand while you improve client retention with an effective nutrition program for high-intensity interval training that follows along with established guidelines. If clients need a specific meal plan make sure they are working with an appropriately credentialed professional to meet their personalized nutritional needs.

5 Lower Back Bodyweight Exercises to Ward off Low Back Pain

Low-back pain (LBP) is the most common chronic pain issue in the U.S., with 60 to 80% of adults struggling with it on a regular basis. While many conditions can lead to LBP, inadequate core strength is a common causal factor.

Increased sedentary jobs and sitting time can lead to muscle imbalances and weak core musculature, putting the low back at increased risk of injury. Here are a few common reasons increased sitting time leads to LBP:

  • The deep core muscles are meant to endure prolonged contractions to support and stabilize the spine. When we slouch in a chair all day, the core remains relatively inactive. This results in a decreased signal from the brain to the core telling it to “turn on” and protect the spine when necessary.
  • The psoas major, one of the strongest hip flexors, originates at the lumbar spine. Sitting can shorten this muscle, putting chronic stress on the low back.
  • The gluteal muscles, which are the powerful hip extensors, become lengthened and weak, known as “glute amnesia.” These muscles are then unable to do their job in regular activities of daily living, forcing other muscles, such as those in the low back, to compensate.

While avoiding sitting altogether is unrealistic, specific exercises can help to minimize your chance of developing LBP. Here are five effective lower back bodyweight exercises you can do anywhere to ward off LBP.

Plank

plank

Tried and true, nothing enhances core stability like a plank. Start with your elbows positioned directly below your shoulders and walk the feet back one at a time until the body is in a straight line. Engage the quads, glutes and core, while pushing the floor away through the toes and forearms. Perform one to three sets for 30-60 seconds, or as long as you can maintain proper form.

Ramp it Up: To increase the challenge, find an unstable surface. This can be done by placing the forearms or feet on a soft pad or exercise ball, or by raising one arm or leg. Your hips and shoulders should remain in line with one another throughout.

Pare it Down: Decrease the challenge by elevating the surface. Position the hands or forearms on a bench, table or railing at a height that is challenging but allows for maintenance of proper form.

Side Plank

side-plank

While the standard plank is helpful for reducing the risk of LBP, the side plank may be even more beneficial because it requires activation of the internal and external obliques. It’s imperative to strengthen these muscles, as they help control rotational movements of the spine. Start with your elbow positioned directly below your shoulder. With the feet stacked or staggered, drive up through the lower obliques until the body is in a straight line. Keep the shoulders and hips stacked. Perform one to three sets for 30-60 seconds, or as long as you can maintain proper form.

Pare it Down: Drop a knee to the floor for additional support or find an elevated surface to place the hand or forearm, reducing the challenge on the core.

Back Extension

back-extension

Think of the core as a box. To prevent LBP, all sides of the box need to be strong and stable. Back extensions help strengthen the often-overlooked posterior side. With your lower body supported on a table or tall bench, let the upper body hang toward the floor (you will need a partner or strap to anchor your legs to the table). Engage your entire core and extend your upper body until it’s in line with your legs. Be sure to avoid extending past 180 degrees (where the upper body is higher than the legs) to limit compressive forces on the lumbar spine. Lower slowly and repeat for one to three sets of 10-15 repetitions.

Ramp it Up: Increase the challenge by making this an isometric exercise. Hold the top position for 30-60 seconds, or as long as you can maintain proper form.

Supine Gluteal Bridge

supine-gluteal-bridge

Weak gluteal muscles contribute to LBP by passing their work to the low back. The powerful gluteal muscles support activities like walking, running, squatting and deadlifting, but when they lack sufficient strength, the back bares the brunt of the load. Start in a sit-up position with your arms down by your sides. Press firmly through your feet and engage your glutes to lift up the hips, creating a straight line from the heels to the shoulders. Hold for two seconds and lower slowly. Perform one to three sets of 10-15 repetitions.

Ramp it Up: Increase the challenge by performing this exercise with a single leg, while maintaining level hips. 

Bird Dog

bird-dog

You’ve likely seen this exercise performed at the gym. And it’s probably been done incorrectly. To perform properly, the trunk should remain stable, while the arms and legs move.

Begin in a quadruped position with your core engaged. Slowly raise one arm and the opposite leg to torso height. Your hips and shoulders should continue facing the floor. Slowly lower and repeat for 10-15 repetitions or hold the top position for 15-30 seconds. Repeat one to three times on each side.

Ramp it Up: Instead of the typical flexion and extension seen with this move, try a lateral bird dog. Once you reach the top position with the arm and leg extended, move both appendages a few inches laterally. This will dramatically increase the core challenge. Slowly return to the extended position and repeat for one to three sets of 10-15 repetitions.

Low-back pain is a common and debilitating condition. With a proper routine, you can strengthen your core and gluteal muscles and reduce your injury risk. This workout can be performed with nothing but your body weight—at home, in the gym or at the office. To further protect your low back, maintain an upright, engaged posture while on the job and avoid staying in any one position for too long.

6 Lower-body Exercises to Do Instead of Squats

Hip mobility and strength is essential for many daily activities like bending down to pick up an object or young child from the ground, walking up stairs or simply getting up from a seated position. In addition to providing an appealing shape, the glutes play an essential role in optimizing human performance for athletes, dancers and other people who move for a living. The primary role of the hip extensors, which include the hamstring and adductor muscles of the thigh, is to extend the hip during gait (walking or running) and provide dynamic stability when on a single leg. The hip extensors are responsible for lower-body strength and for distributing power from the ground through the rest of the body. It’s important to note that a lack of proper hip strength could lead to a sore low back, so doing exercises for your glutes will not only help improve the way you look, it can also help reduce your risk of back injury.

While the squat is an excellent exercise for enhancing both athletic performance and aesthetic appearance, when done incorrectly, it can cause discomfort in the low back and possibly injure the knee. If you are interested in strengthening your hips and developing an appealing backside, but want to reduce your risk of injury, try these six lower-body exercises that can help you achieve the results you want.

1. Glute Bridge

Glute bridge

Performed on either a floor or bench, glute bridges use the hip extensor muscles in a position that is safe for both the back and knees. To increase the level of difficulty, place a weight across the bony part of the hips (the ASIS of the pelvis). For best results, focus on pushing your heels into the floor and lifting your hips up to the ceiling while keeping your low back stable. D two to three sets for 12 to 15 reps (or until fatigue), resting for 45 seconds between sets.

2. Hip Hinge

(also known as a Romanian Deadlift)

Hip hinge

This is a safe lower-body exercise that focuses on the glutes, hamstrings and, adductors, making it great not only for your rear end but also your upper and inner thighs. During this movement, your lumbar spine (low back) should remain stable and stiff and the movement should come directly from your hips. When learning this exercise, place your hand on your low back as a reminder to NOT let it bend. Start by maintaining a stable spine and your knees slightly bent. Lean forward by pushing your rear end toward the wall behind you until you feel tightness in the back of your legs (do not let your back bend). Return to the starting position by pushing your feet into the floor and your hips forward. Learn to do this movement with your body weight first before adding resistance.

3. Step-ups

Step-ups

Walking or running up stairs or simply doing step-ups on a box is a great way to use all of the muscles responsible for extending and creating dynamic stability of the hips during upright movements. Use a box that is the same height or slightly lower than your knees. Place your right foot up on the step and push your foot into the box to step up. When you reach the top, lift your left knee into the air (this creates additional movement of the right hip, which is essential for using the entire muscle), lower the left leg and repeat all the reps on one side before switching legs. Do 10 to 12 reps on one leg before switching to the other leg; repeat for two to four sets. To increase intensity and build muscle more quickly, hold dumbbells in your hands.

4. Rear Lunges

Rear lunges

Squatting or lunging can be painful to the knee joint, particularly when the knee bends more than the hip or ankle during the movement. Stepping backwards removes the risk of too much forward motion from the knee by transferring most of the movement into the hip. Start with both feet hip-width apart. Step back with your right foot and slowly lower your right knee toward the ground while leaning forward slightly (maintain a stable spine during this forward lean). Return to standing by pressing your left foot into the ground and pulling yourself back to standing with your left leg. (For extra emphasis on the inner thigh muscles, think about sliding your left knee back.) Perform 10 to 12 reps on one leg before switching to the other leg; perform two to three sets with 30 to 45 seconds of rest between sets. To increase the level of difficulty, hold dumbbells in your hands or a medicine ball in front of your chest.

5. Lateral Lunges

Lateral lunges

The benefit of doing lateral or side lunges is that you not only use your hip extensors, you also involve the quadriceps muscles, which help to create shape for your outer thigh. Start with both feet parallel. Step directly to your right while keeping your left foot pressed into the ground. As your right foot hits the ground, push your right hip back toward the wall behind you while reaching for your right foot with your left hand. (This reaching motion increases the range of motion in your hip, placing extra emphasis on your glutes.) Return to standing by pushing your right foot into the ground and pulling with the inner thigh muscles of your left leg. Complete 10 to 12 reps on one leg before switching legs; perform two to four set with 30 to 45 seconds of rest between sets. To increase the intensity, hold one dumbbell (vertically) or a medicine ball in front of your chest. 

6. Kettlebell Swing

Kettlebell swing

WARNING: This exercise may cause rapid development of your glutes, but is often done incorrectly. First, DO NOT attempt this exercise until you master the hip hinge. Once you can do two to four sets of 10 to 12 hip hinges without discomfort, you are ready to progress to the kettlebell swing. When done correctly this exercise is a dynamic version of the hip hinge (which is why mastering that movement is critical before learning this one). With your feet hip-width apart, start with the kettebell between your legs with your knees slightly bent. Lean forward by pushing your hips back (DO NOT ALLOW YOUR BACK OR KNEES TO BEND) to move the kettlebell slightly behind you. Explosively push your feet into the floor and your hips forward to move the kettlebell in front of the body. (Hold on to the weight with your hands, but avoid the urge to use your shoulders—the movement comes from the hips, not your upper body.) Allow the kettlebell to fall back between your legs while hinging forward to decelerate the movement. R for eight to 12 reps without letting your back bend or knees squat down.

If you want a lower body-focused workout to address your backside without having to do squats, select three of these exercises and, after a good warm-up, perform three to four sets of 10 to 12 reps for each exercise, resting approximately 30 to 45 seconds between sets. For best results do all reps on one leg before switching to the other leg. If you look closely, only one of these exercises requires the use of equipment, which means these are excellent options for when you can’t make it to the gym or simply prefer to work out at home. A great side benefit of focusing on your lower body is that you can quickly increase your lean muscle mass, which elevates your resting metabolism and increases the number of calories you burn outside of your workouts.

You can train your lower body almost everyday by doing strength training with weights one day and cardiovascular training the next. However if your goal is to develop optimal size and definition, you should allow at least 24 hours of rest after a good strength-training workout. For example, you can make a three-day split of lower-body exercises on day one, upper-body exercises on day two and cardio training on day three (make sure to take at least one complete rest day per week to allow for optimal recovery).