Saturday, July 4, 2020

Creating Successful Youth Fitness Programs

https://acewebcontent.azureedge.net/expert-articles/2018/01/2017-01-24-creating-successful-youth-fitness-programs-header.jpg


Youth need regular opportunities to be physically active. Unfortunately, schools are not meeting their needs through physical education classes and recess, and many children and adolescents live in neighborhoods with limited space and options for safe, age-appropriate physical activity outside of school hours.

Understanding Physical Literacy in Youth

While youth fitness settings vary by community, ranging from afterschool programs and youth sports to local recreation and faith-based facilities, there are key variables that all programs can focus on to foster physical literacy – defined by The Aspen Institute’s Project Play as “the ability, confidence, and desire to be physically active for life.”

The attributes of physical literacy – ability, confidence and desire – are built through positive physical activity experiences that are diverse, fun, appropriate and safe. Free play can provide these experiences, especially for younger participants, but societal changes have reduced the availability of these opportunities in schools, recreation centers and community parks. The United States Olympic Committee (USOC) Path to Excellence Survey found that there was a decrease in the percentage of athletes reporting unstructured activity with friends – free play – as a means of introduction to their sport, dropping from 35% of athletes on the initial survey (1984 to 1998) to 24% on the most recent survey (2000 to 2012).

The Importance of Quality Coaching and Fun

In this same USOC survey, athletes also reported that quality coaching was important to their development from a young age. Quality coaching is equally important for youth participating in recreational activities and leagues, and even more so for youth who are inactive and behind in their development of fundamental motor skills such as running, throwing, catching, kicking, balancing, twisting, jumping and landing. Without these skills, inactive youth will continue to fall behind their peers, increasing their chances of becoming inactive adults. Exercise professionals can develop and lead programs that incorporate these skills into moderate-to-vigorous physical activity (MVPA), helping youth to build toward the recommended 60 minutes of MVPA per day while increasing their self-efficacy for participation in a variety of activities.

Motor skills and MVPA are not enough to build a successful program. While it may seem obvious, programs will fail if youth participants do not enjoy them. Fun is at the heart of successful youth fitness programs. In recreational programs, fun should be the primary focus of each class with skill, strength, flexibility, balance and cardiorespiratory endurance activities sprinkled among the fun. In competitive leagues, fun activities can be used as transitions from one challenging drill to the next or woven in as competitive games between small groups.

An important factor in building fun is variety, or the sampling of many different activities. Sampling is the opposite of specialization. Early specialization among young athletes has become more common, with leagues in many sports now offering multiple seasons throughout the year. This early specialization can lead to overuse injuries from repetitive motions, a lack of development of other motor skills and burnout. Early sampling on the other hand provides youth with the chance to develop well-rounded motor skills while learning a variety of activities. This gives them the ability and confidence required to build physical literacy, providing them with self-efficacy required to try new activities.

Ensuring Safety in Youth Programs

Youth fitness programs should be comprised of activities, exercises and training volumes that are appropriate for the health, fitness, ages and skill-levels of participants. The exercise environment should be assessed daily to ensure that it is hazard-free and adequate for the planned activities and group size. Equipment should be regularly inspected to ensure that it is working properly or that it is removed for repairs or replacement. Leaders of youth fitness programs should always know the location of first aid equipment and the protocols for emergencies. Safety should never be compromised in youth or adult programs.

Wrapping Up

Engaging inactive youth in fun physical activity programs that build physical literacy is crucial for their development and the current and future health of the nation.  Exercise professionals with the enthusiasm for and proper education for working with children and adolescents have tremendous opportunity to make an impact on the health of our youth by serving as leaders and teaching them how to become active and stay active into adulthood.

5 Steps for Influencing Meaningful Health Behaviors In Children

https://acewebcontent.azureedge.net/blogs/2020-AI_HL_Healthmentorshipchildren_Header.png


For the first time in history, there’s data that suggests current adults may outlive their children. Early onset obesity, diabetes and other lifestyle-related health pathologies are currently wreaking havoc on the prognosis for our kids’ long-term health.

There has never been a more important time for adults to “step up.” Kids need parents, teachers, coaches and other positive health influencers more than ever. If you’ve ever worked with kids, however, it becomes clear pretty quickly that their psychological needs are different than those of adults.

I’ve been mentoring kids and consulting with youth organizations for more than 20 years. During this time, I’ve identified five key steps in the process of helping kids improve their health-related decisions. These components of youth communication and behavior change have helped kids from five years old all the way through college.

Step #1: Walk the Talk

A mentor once asked me if someone were to watch me all day, without hearing me say a word, could they tell what’s important to me? As a mentor, your actions speak louder than words. As adults, too often we expect more from kids than we do from ourselves.

Before helping guide others’ lifestyles, it’s important to audit your own. What do your kids see you do? It’s a confusing message when they are told to stay off technology by parents who have their noses buried in a device. You can’t tell them to “be more active” from the couch. A speech about healthy eating is not as effective with a mouth full of fast food.

When your beliefs, actions and message are aligned, kids can see that. This increases trust, which is a critical element of effective mentorship.

Step #2: Make Healthy Habits Relevant to Kids

We can all agree that different things have been important to us during different periods in our lives. During these times, the things that are important to us shape our beliefs and behaviors.

When addressing healthy habits with kids, the outcomes of these habits should impact metrics that are currently important and relevant to them. “Healthy” vs. “not healthy” means very little to a seven-year-old. However, if a child’s goal is to “grow,” certain food choices can help him or her do that. There are other foods one can choose, but these likely won’t help a child reach his or her goal.

If you aren’t sure what’s relevant to children, default to “fun.” Odds are, if your activities or messages make them smile or giggle, they’re engaged. Kids are naturally imaginative, so indulge their imagination. “Measure” them before and after eating greens. If they like video games, craft some physical activities after popular video games.

For older kids, facilitate a discussion about how attaining their goals would impact their lives. Some kids may have a difficult time articulating what is important to them. Make sure you listen carefully and observe their actions and interactions. What they say and do unprompted will offer important insight into what they currently value. Adjust your influencing message and actions appropriately.

Step #3: Focus on Short-term Rewards

Adult brains develop over time to have the capacity to link short-term actions with long-term consequences or rewards. This capacity is largely governed by the prefrontal cortex, which doesn’t fully develop until well into our twenties.

While research has demonstrated that some young children have a greater capacity than others for linking short-term actions with long-term outcomes, most young brains are programmed for short-term outcomes. This is why it’s important to help kids draw a short-term link between positive health choices and positive short-term outcomes.

Obviously, making activities fun is a fast and direct way to do this. When the concepts are a bit deeper, look for opportunities to pair an activity or action with the immediate outcome. “Bad day at school? Let’s go for a walk.” “Feeling angry or sad? Let’s take five “balloon” breaths together.” “Before practice, drink this cup of water to hydrate your body.” After the positive action, have a discussion about the outcome.

It’s critical to keep things simple. If you’re a coach or teacher, simple statements such as “Eat three green things before I see you next,” or “See if your family can do a combined total of 30 push-ups” are simple to do and easy to remember. Laying out a complex behavior-change plan is too overwhelming for most young kids.

Step #4: Make Your Environment Reflect Your Message

Whether you are in the home, in the classroom or on an athletic field, consider how the environment you create impacts your mentorship. Does it reinforce the message you are sharing? If at home or in the classroom, are there opportunities to be active? What foods are the most readily available? How is technology positioned as a free-time activity? What are the most prevalent attitudes around healthy behaviors?

The language you use when discussing healthy habits is critical. If healthy eating is presented as “Daddy has to eat yucky food because he has to lose weight,” or exercise becomes “Mommy has to run so she doesn’t get fat,” healthy habits are positioned as punishment for “crimes.”

Regardless of the environment in which you influence kids, create a culture and environment of wellness.

Step #5: Suspend “Good” vs. “Bad”

In even the healthiest lifestyle, there is room for imperfection. That’s why the notion of “good” vs. “bad” foods, behaviors, etc., should largely be avoided. There are actions and behaviors that are tied to goals, and those that aren’t. Discuss the impact of behaviors that don’t deliver them to their goals. However, help them understand that when these things are done occasionally, it's fine. Obviously, there are some exceptions (smoking, dangerous behavior, etc.), but help kids understand that a healthy lifestyle is not a “behavior prison.”

Even if kids don’t always make the right decision, understanding that they do have a choice can be the most important thing you can teach them. Furthermore, focusing on what they should do vs. what they shouldn’t do is far more effective than providing a laundry list of “don’ts.” When an adult comes across as judgmental, it creates an “us vs. them” mentality. In this case, healthy habits appear more as an assignment than a guide.

More than ever, we need passionate, educated influencers to help change the unfortunate course that has been set for our kids’ health. The next time you have an opportunity to impact a young life, consider these five steps to inspire them to take positive ownership over their healthy lifestyle habits.

Become an ACE Certified Personal Trainer and help pe

Addressing Physical Literacy during COVID-19

https://acewebcontent.azureedge.net/2019_01%20Total%20Storytelling%20Blog/GettyImages-535652283%20dad%20son%20soccer%20-%20sm.jpg


With people unable to gather in their local parks to go for walks, ride bikes or play some pick-up basketball, many youngsters are likely growing increasingly frustrated with their lack of physical activity. 

This may be great time to (re)introduce the concept of physical literacy to young athletes who do not want to lose their skill or fitness levels but are unable to take part in their chosen sports, as well as to nonathletes who would really benefit from building a solid foundation of good motor skills. 

Physical literacy is defined by The Aspen Institute (2015as the ability, confidence and desire to be physically active for life. Even if one of your youth clients doesn’t dream of someday playing in the NBA or competing in the Olympics, he or she can undoubtedly benefit from gaining skill and confidence in the ability to move efficiently and with good form. For example, a child who knows how to swim will be able to participate in countless water-based activities for the rest of his or her life, like one day swim with their own children.

Physical literacy goes beyond the development of foundational motor skills like running, balancing and throwing, however, as it also requires the mindset to use those skills. Confidence involves knowing that you have the ability to play sports or enjoy physical activities as opportunities arise. Once a child has the ability and confidence to participate, his or her desire to be active can be developed through early positive experiences with physical activity that are fun and motivational (The Aspen Institute, 2015) 

The Aspen Institute identifies 10 sectors that are well-positioned to play key roles in advancing physical literacy, including community recreation organizations, schools, healthcare providers and fitness facilities. When it comes to exercise professionals, the following recommendations may be particularly applicable during COVID-19: 

  • Make physical literacy the basis of programming for families 
  • Offer complimentary physical-literacy assessments to children of adult clients 
  • Reduce or eliminate talk of body image 
  • Use kid-friendly talk, imaginative scenarios and music that matches the activity and participant level 
  • Prioritize effort, not performance 
  • Teach good form 

Parents and guardians are also identified as a key sector by The Aspen Institute. Some of the following are things you may want to consider as you virtually coach or train youth, or you may want to share these with adult clients who are struggling to keep their kids active during this time of social isolation. 

  • Integrate physical-literacy concepts into children’s daily activities and help them to develop physical literacy outside of traditional sports environments 
  • Promote unstructured play 
  • Emphasize the importance of engaging in a wide variety of sports or activities to prevent early specialization and associated stress 

According to The Aspen Institute (2015), the efforts to improve the physical literacy of children have come largely in response to declining rates in physical activity around the world. The risk of physical inactivity among youth are well-known, including weight gain, missed school, worsened academic performance and a higher likelihood of having obesity as an adult.  

From a more positive perspective, children with better-developed motor skills are more active as early as the preschool years, and that trend carries through the grade school years and into adolescence and adulthood. These strange times offer exercise professionals a unique opportunity to work with entire families, helping people of all ages to learn new skills, gain confidence in their abilities and have fun experiences associated with physical activity. 

Prenatal Workout Recommendations

https://acewebcontent.azureedge.net/blogs/opengraphimages/blog-fitnovatives-073115.jpg


Prenatal Cardiovascular Fitness

What is comfortable during pregnancy varies from mother to mother. Water fitness is my personal favorite. Getting in the pool eases the aches and pains that come with increased weight and a shifted center of gravity. Exercises in these classes are also easily modified based on the amount of energy you have on any given day. 

Other great cardiovascular options include:

Walking

Being a runner most of my life, I had to embrace the fact that walking can actually be a wonderful workout. If your client needs more of a challenge, encourage her add some hills to her route.

Group Indoor Cycling

Body weight does not play a major factor in this type of workout, which makes it a good option for those who want to continue exercising throughout the duration of their pregnancy. Others, however, may find the seat and positioning a little uncomfortable. 

Swimming

Floating in the water can give the pregnant exerciser a sense of relief and freedom. If your client’s low back feels at all strained while swimming, recommend adding a pull buoy between the ankles to help keep the body aligned. 

Cardiovascular Machines

The elliptical, stationary bike, Stairmaster and treadmill are all great options, particularly because they offer less impact on the body than other forms of cardiovascular exercise.   

Mind/Body

I cannot emphasize the importance of taking a prenatal yoga and/or meditation class during pregnancy. These classes can provide the expecting mother with many exercise options to alleviate pain and can help her become more comfortable with her changing body. Plus, the relaxation techniques will come in handy during labor and throughout stressful new-mom moments. 

Putting it All Together

During pregnancy, a woman should aim for a minimum of three, 30- to 60-minute workouts per week, featuring a combination of cardiovascular fitness, strength training and mind/body exercise.

Prenatal Fitness Modifications For Safety and Comfort

https://acewebcontent.azureedge.net/blogs/opengraphimages/blog-fitnovatives-072415-10.jpgPregnancy is often a woman’s first lesson in flexibility as she approaches motherhood. Despite the best-laid plans, factors like morning sickness and fatigue can make it difficult—if not impossible—to follow an ideal prenatal fitness program. In fact, it is not uncommon for women to have to adjust their programs on the fly, depending on how they feel during each stage of pregnancy. 

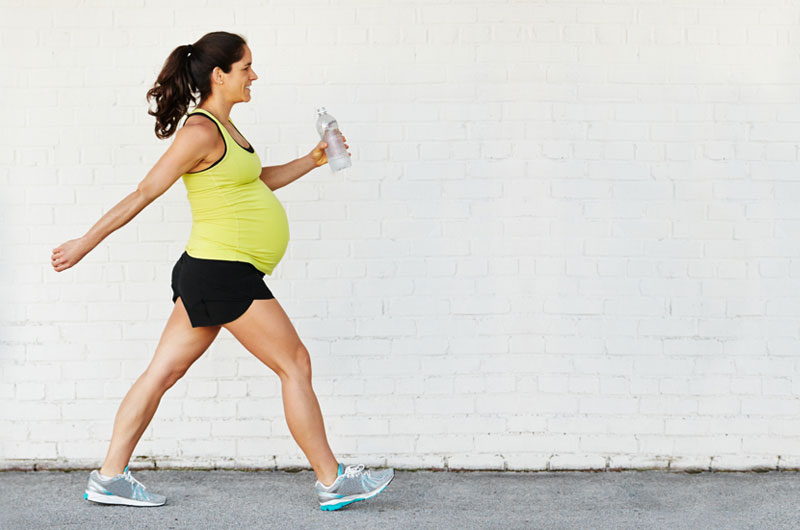
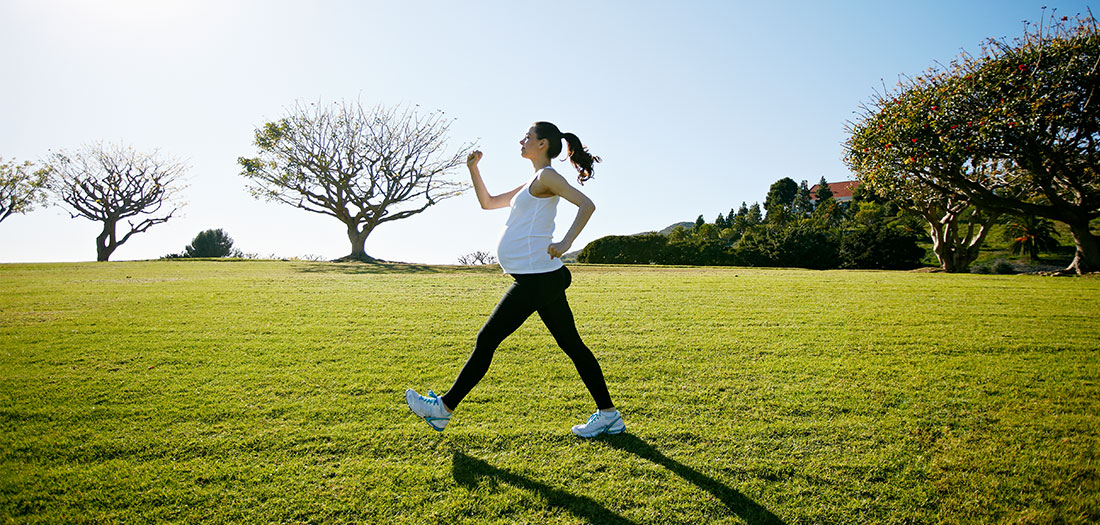
Of course, every woman is different. While some have to dramatically modify their fitness programs, others continue their normal workouts, including high-intensity activities like running marathons and participating in boot-camp classes. In fact, researchers have discovered that some women can safely continue almost any activity they were participating in before pregnancy throughout most of their pregnancies. While this may be true, all women should pay close attention to how they feel and be prepared to modify their programs accordingly. 

Prenatal Precautions 

The American Congress of Obstetricians and Gynecologists (AGOC) published their first recommendations on exercise in 1985. Since then, these have been updated in 1994, and again in 2002. You can read the complete current ACOG Guidelines here to learn how to identify absolute and relative contraindications to exercise during pregnancy. 

Reasons to discontinue exercise and seek medical advice include:

  • Vaginal bleeding
  • Sudden swelling of the ankles, hands or face
  • Dizziness or faintness
  • Persistent, severe headaches and/or visual disturbances
  • Chest pain, excessive fatigue or palpitations
  • Unexplained abdominal pain
  • Calf pain or swelling
  • Persistent contractions that may be indicative of preterm labor
  • Insufficient weight gain [less than 2.2 pounds (1 kg) per month during the last two trimesters]
  • Amniotic fluid leakage 

Source: American College of Sports Medicine. (2000). ACSM’s Guidelines for Exercise Testing and Prescription, 6th ed. Philadelphia: Lippincott, Williams & Wilkins. 

Additional precautions include:

Hyperthermia

Increases in fetal temperatures from high fevers have been related to birth defects, which initially led doctors to be concerned about elevated body temperatures during exercise. Current research has shown that this is not a major concern, as adaptations that happen during pregnancy and exercise help women regulate their core body temperature more efficiently. Even so, it is still very important to:

  • Stay well hydrated
  • Avoid exercising in extremely hot and humid temperatures

Not Consuming Enough Carbohydrates

Pregnancy is not the time to think about weight loss. Even when the doctors warn about excessive weight gain, restrictive dieting is not recommended. Pregnant mothers should consume an additional 300 kcal/day and even more if they are exercising regularly. Focus on eating smaller, healthier meals, and eating a healthy pre-exercise snack of protein and carbohydrates. 

Supine Hypotensive Syndrome

While lying in the supine position, the additional weight of the uterus during the second and third trimesters can add pressure to the inferior vena cava, thus potentially causing a decrease in venous return to the heart. This can lead to lightheadedness and dizziness. Some research questions the warnings that this position will lead to a decrease in fetal blood supply, but until there is further research, supine exercises—if performed at all—should be done with caution, in very short bouts and with awareness of the feelings of the expecting mother. 

Maternal Conditions and Exercises That Can Help 

Pregnancy comes with hundreds of aches, pains and unpleasant symptoms. Some people experience almost all of these, while others are fortunate enough that they experience very few. Here are three common aches and pains felt usually during the second and third trimesters and how to use exercise to alleviate them. 

Round Ligament Pain

The round ligament, located in the front of the womb, is stretched as baby and uterus grow, which can lead to a sharp jabbing pain in the lower belly or groin area.
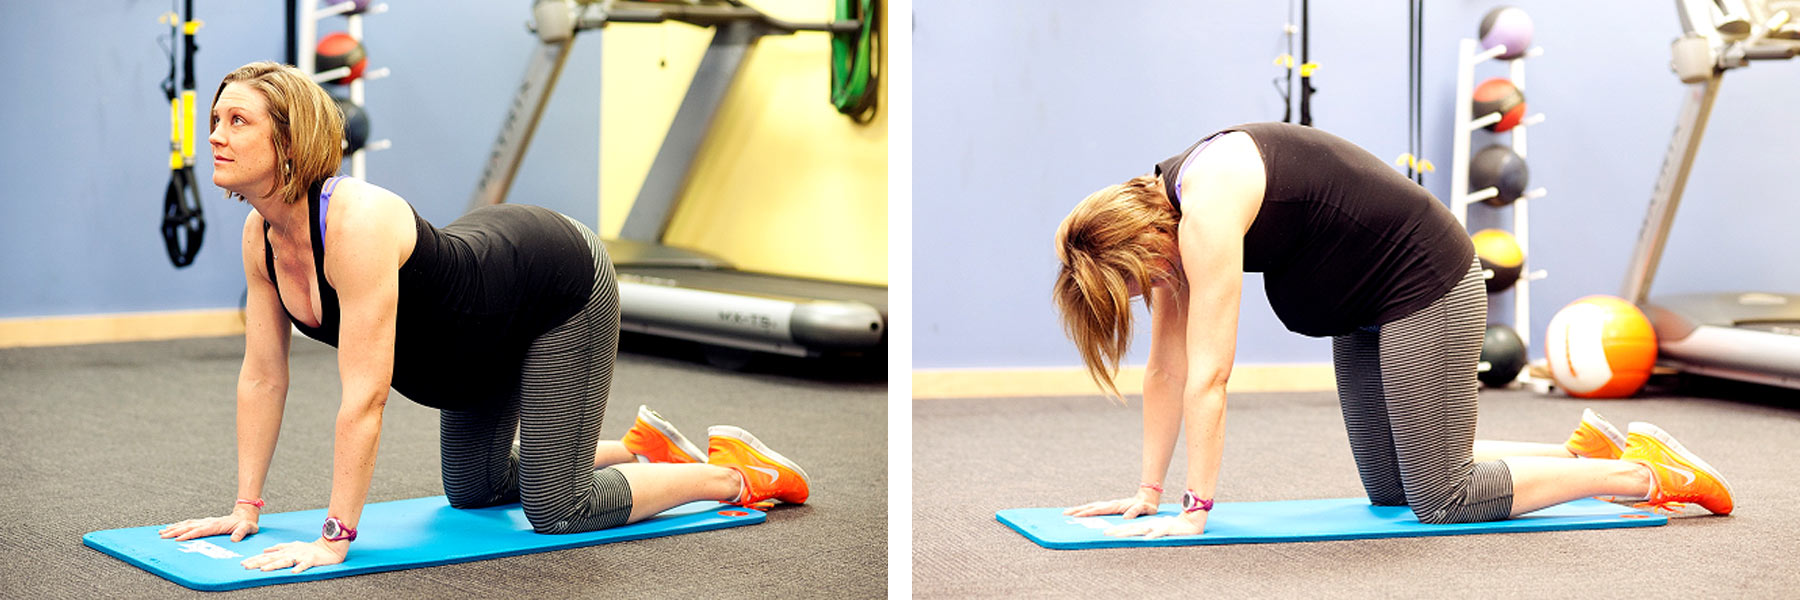
Cat Cow 

cat cow

The Cat Cow Pose is a great yoga move to help alleviate round ligament pain. Assume a quadruped (all fours) position with hands pointed forward. Inhale and round the back high, letting the head fall while curling the pelvis under, relieving tension on the ligament. Exhale, pulling the belly toward the mat, and extending the back body wide to stretch the ligament. Repeat 10 times. 

Diastasis Recti

The linea alba is the tendinous tissue that merges the rectus abdominal muscles with the fascia. Both the rectus abdominis and the linea alba are designed to contract in a vertical fashion, and are not always able to withstand the strong horizontal pressure put on them with an expanding belly. This can lead to a thinning of the linea alba and a protrusion in the middle of the belly.

Seated abdominal compressions

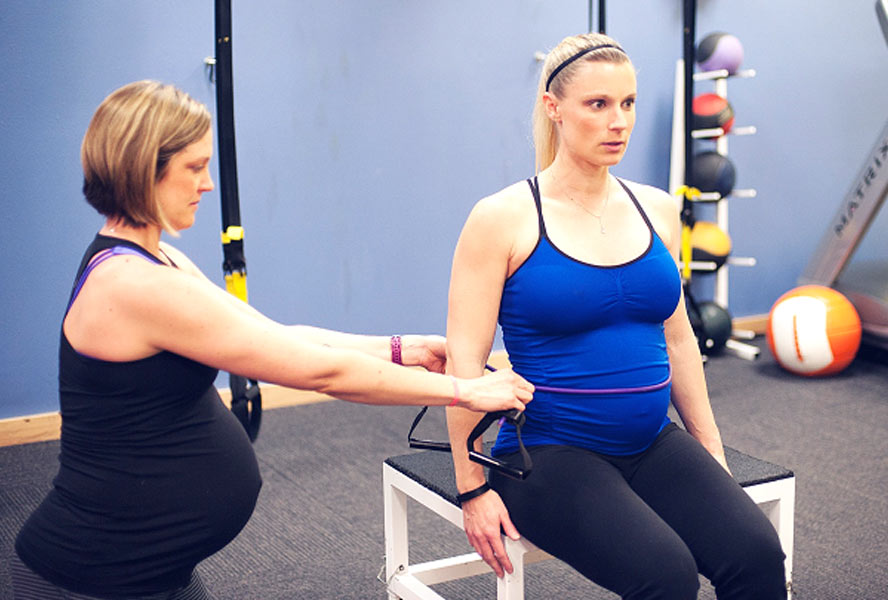
This is a great way to train the transverse abdominals, while also teaching the individual how to engage these muscles.   

Have one partner hold a string or band around the stomach of the exerciser. Encourage them to exhale, drawing the navel in and contracting the lower part of the abdominals. As this new tightness is achieved, the partner holding the string will slightly tighten it while the exerciser continues to breathe under this contraction. If the exerciser is having trouble doing the compression correctly, have them make a “ha ha” or coughing sound to encourage the appropriate contraction. Repeat two to three times. 

TRX resisted heel taps

These are another great option. Begin lying on the ground facing the anchor point. Place both hands in the foot cradles and press down. Keep the core braced and knees bent at 90 degrees. Slowly lower one heel toward the ground until just before the low back rises up. Return to the starting position keeping pressure down in the hands. Aim for two 30-second sets of this exercise. (Note: Because this move is performed in the supine position, avoid doing this exercise any longer than 30 seconds and have the exerciser roll to her left side between sets.) 

Low-back Pain and Posture Issues 

Exercise can ease low back pain for the expecting mother, but if not done properly, it can also aggravate it. Muscles that tend to shorten include the chest, low back, shoulders, hamstrings and calves. Muscles that tend to weaken include the upper back, glutes, abdominals, pelvic floor and quadriceps. Begin by focusing on mobilizing tight muscles, and then work on strengthening weak muscles. Here are some sample exercises: 

Seated or Standing Spinal Flexion

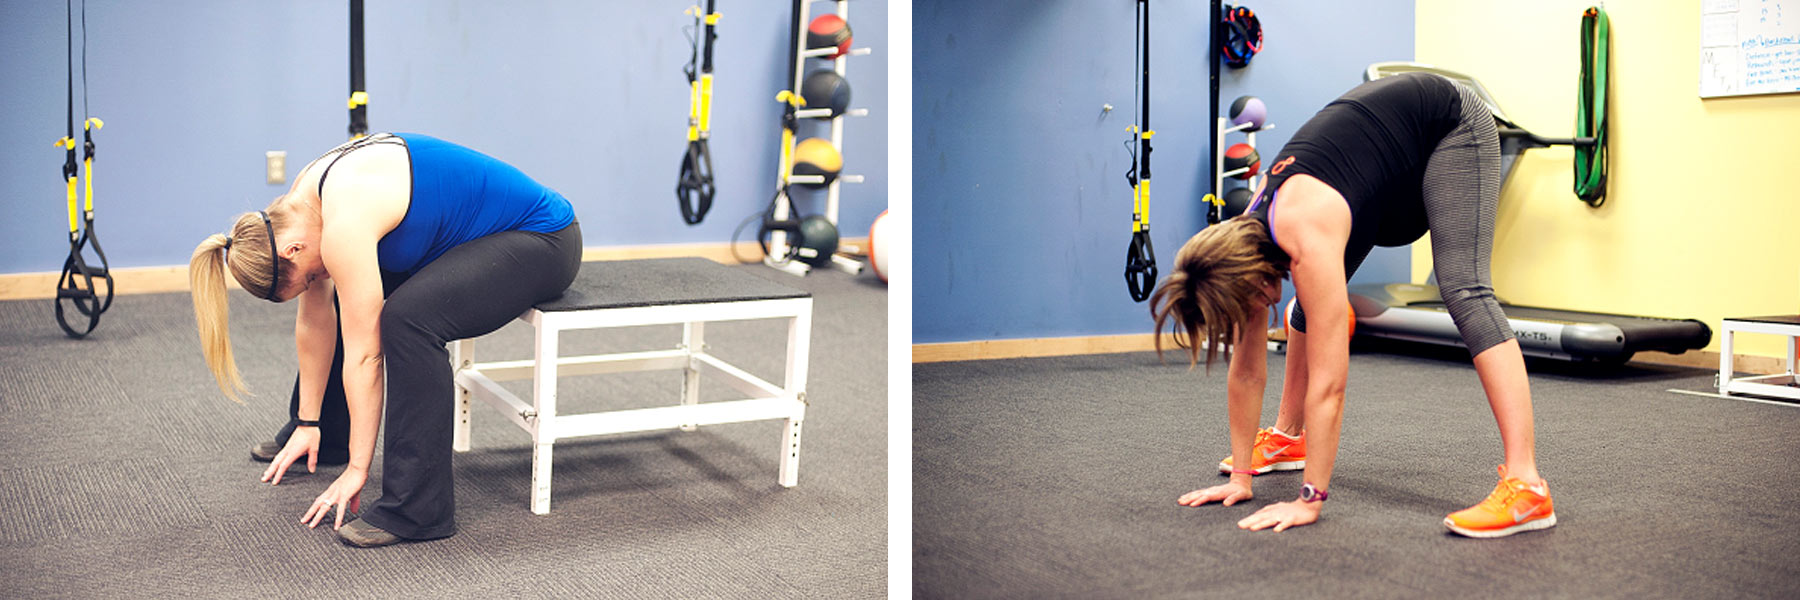
Due to the forced anterior pelvic tilt caused by increased weight in the belly, the lower back and hamstrings often tighten up. 

To perform this exercise from a seated position, sit at the front of a chair with the feet flat on the ground. Separate the knees and bend at the waist. 

To perform this exercise from a standing position, bend the knees and position the legs a comfortable distance apart. Lower the hands to the floor or a step. Slowly begin to lift the tailbone toward the ceiling while straightening the legs. Stop once a stretch is felt. 

Standing Scapular Retraction With a Foam Roller

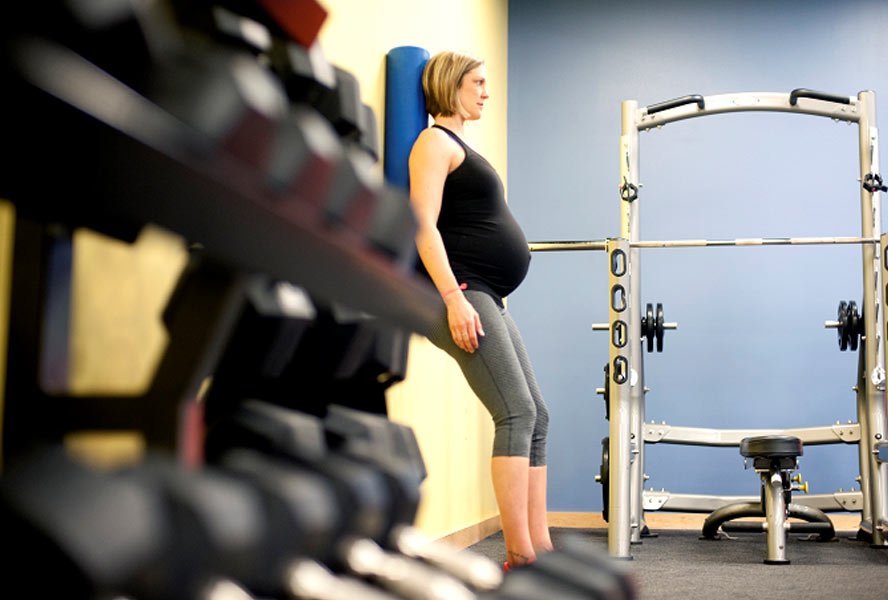
Increased lumbar lordosis also leads to a kyphotic posture in the thoracic spine. This posture can be somewhat alleviated by strengthening the muscles in the upper back.

Place a 3-foot foam roller up against a wall and stand facing away from it. Bend the knees slightly and place the tailbone onto the roller. Continue aligning the back on the roller so that an imprint is felt on the spine. Gently (not forcefully) hug the foam roller with the scapula and hold for one minute.

Pelvic Tilts (Supine or Standing)

pelvic tilt

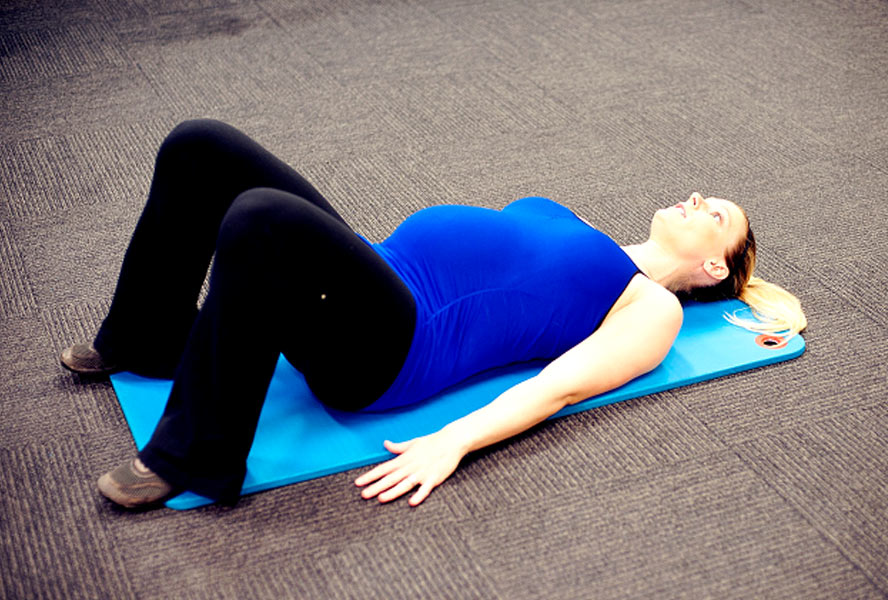
Pelvic tilts are another great exercise for alleviating low-back pain. This move also strengthens the abdominals while stretching the tight lower-back muscles.

Begin lying supine on the ground or standing against a wall with knees slightly bent. Gently tighten the glutes and belly muscles and shift the pelvis posteriorly. This should flatten the curve in the lower back and create an imprint on the mat or wall. Hold for six seconds and repeat. This exercise can also be performed from a seated or quadruped position, or while siting on a stability ball. (Note: If performing this exercise in the supine position, avoid holding it for longer than 30 seconds. Have the exerciser roll to her left side between sets.)

Side-lying Clam Shell

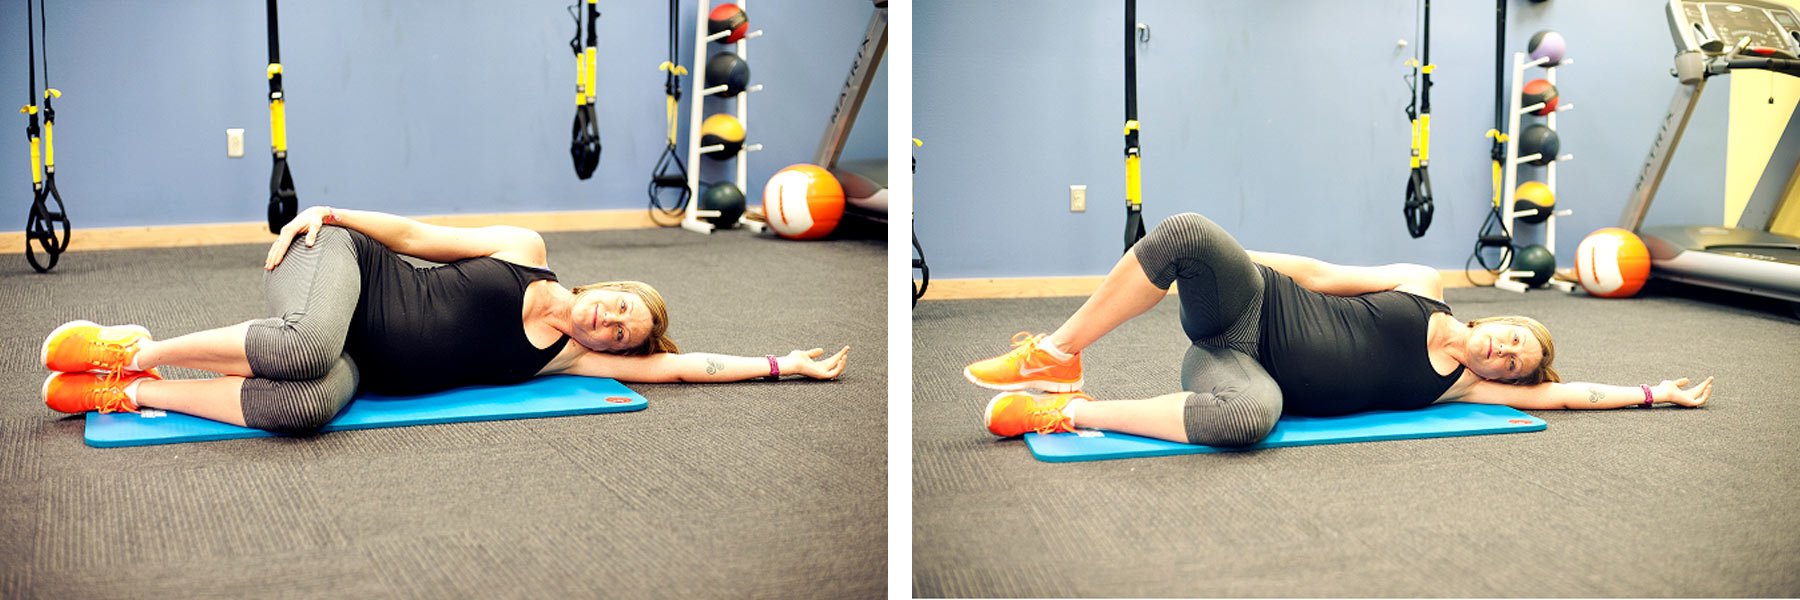
With the increased anterior pelvic tilt, the glutes and hips are weakened due to an over-tightening of the hip flexors. Strengthening the gluteus medius and minimus helps stabilize the sacroiliac joint, which can become loosened and unstable during pregnancy. This is a great exercise to do in between supine exercises as it only takes a quick roll to the side.

Begin in a side-lying position with the pelvis perpendicular to the floor. Knees should be bent between 45 and 90 degrees. Brace the core and keep the feet together. Contract the glutes and lift the top knee off of the bottom knee. Stop before the pelvis moves or the hips roll back. Hold for five to 10 seconds and repeat. 

Assisted Lunges

cat cow

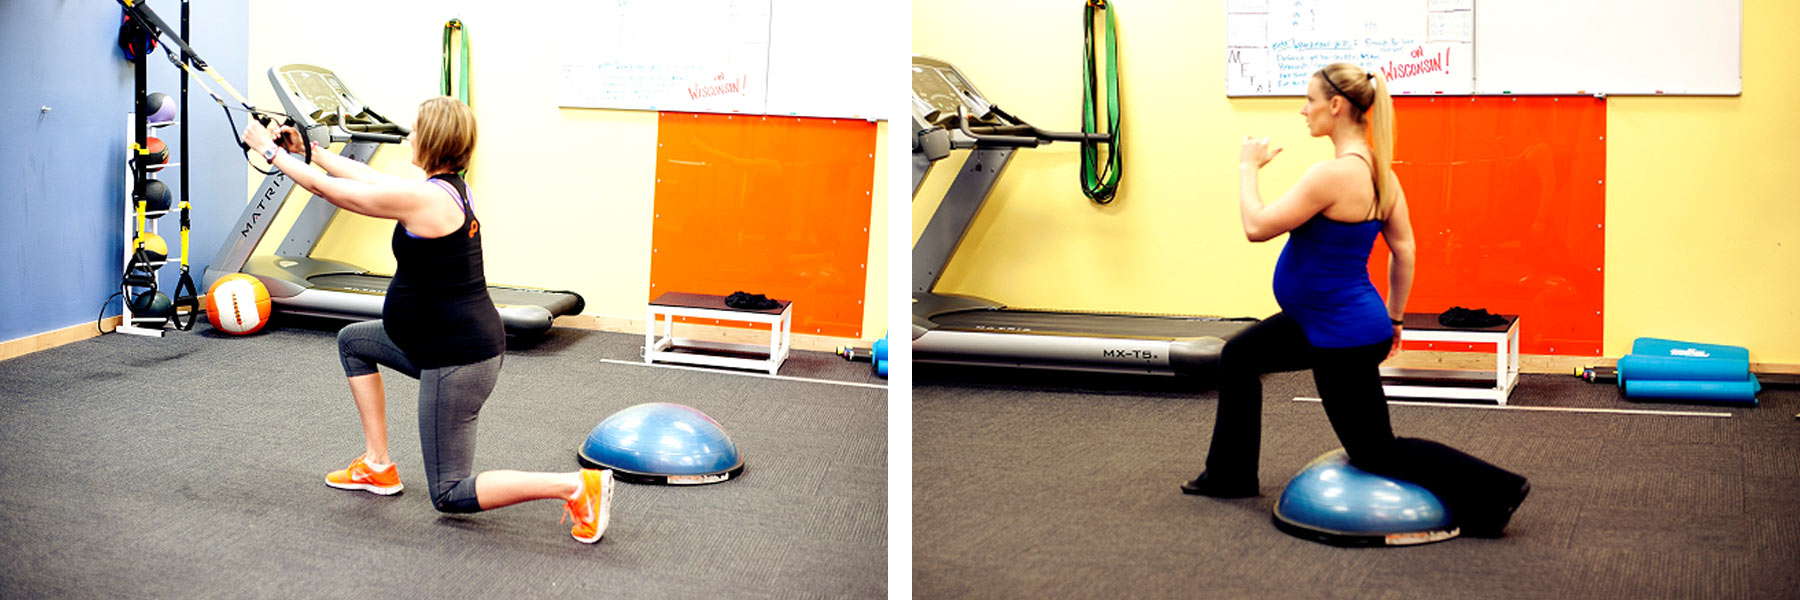
Again, strengthening the glutes is important to help stabilize the hips and improve posture during pregnancy. Assisted lunges are also great for improving both balance and leg strength. As pregnancy progresses, a woman typically gains more weight and her joints become more lax, which can make lunges more difficult. Lunges can be unloaded using a suspension trainer or by placing a BOSU ball under the back knee. While returning to a stand with each lunge, ensure the glutes are engaged by thinking of scissoring the legs together, helping to preserve proper posture and glute engagement.

5 Reasons Walking is the Best Exercise During Pregnancy

https://acewebcontent.azureedge.net/expert-articles/2017/01/2017-01-27-walking-best-exercise-pregnancy-header.jpg


Pregnancy causes many changes in the female body, including weight gain and hormone shifts that can affect energy, mood and appetite. But here’s some good news: Walking can help.

“Walking is an excellent way to maintain healthy circulation and build stamina and strength while the baby grows and mama has more weight to support,” explains April Mellito, a licensed midwife in Bozeman, Mt.

Even if a woman has previously been sedentary, it is now recommended that she begin an exercise program if she has a healthy pregnancy. The key is to start conservatively and progress according to how she feels. Walking is ideal for helping both mom and baby reap the benefits of physical activity. Every pregnant woman should, of course, check with her medical practitioner about how much physical activity is appropriate for her individual situation. 

Natural Resistance Training

Weight gain is a natural part of pregnancy. As a woman’s body gets heavier, the muscles strengthen to carry the extra weight. This causes her muscles to strengthen naturally, without lifting weights. However, the leg muscles only get stronger in relation to how much physical activity she is doing.

Mobile Joints

Walking also helps keep a woman’s joints flexible through their entire range of motion. Everybody knows that joints and muscles get stiff when they’re not moving. Walking prevents this problem and the associated discomforts because moving the legs keeps the hip joints loose.

Flexible and strong hips are especially helpful when a woman gives birth, says Mellito.

Worried About Weight Gain?

Gaining 25-35 pounds is normal and healthy during pregnancy, but a woman can easily gain more than that. Getting out for a walk every day or every other day helps keep a woman’s metabolism (efficiency of burning calories) regulated and weight under control. Low-intensity walking might not increase metabolism, but it burns calories. A woman can increase her metabolism by intensifying her walk by adding hills or distance. She can also stop and do 20 squats every five to 10 minutes for a similar effect, if the additional exercise is well tolerated.

Cultivate a Peaceful Mind

There’s a lot to think about when pregnant, with feelings of anticipation, worry, excitement and expectation at an all-time high. The endorphins generated from exercise can help a pregnant woman reduce her stress and maintain a positive state of mind; walking outdoors has been shown to be particularly beneficial in this respect.

Create Positive Post-pregnancy Habits

Having a routine of walking in place before the baby arrives makes it more likely that a woman will make exercise a postpartum habit, too. Walking is an effective and gentle way to get back in shape after giving birth.

Relaxin: Pre- and Postnatal Exercise Considerations

https://acewebcontent.azureedge.net/2018-03-27-relaxin-exercise-considerations-header.jpg


A woman’s body goes through vast and profound changes during pregnancy and postpartum recovery. Among these changes includes increasing amounts of a hormone called relaxin, which can make her exercise routine even more challenging.

Relaxin levels increase in the first trimester of pregnancy and aid in the implantation of the fetus in the uterus. Specifically, ligaments at the pubic symphysis and the sacroiliac joints experience laxity, which enables the pelvis to make room for her growing baby. However, because relaxin causes ligamentous laxity throughout the body, all of the joints could be affected, which may present some significant balance challenges. As a woman’s pregnancy progresses, her balance will naturally be challenged because of the increased weight distribution as baby grows. Relaxin is an added consideration to her already continuously changing body, which needs to be accounted for in developing her fitness routine.

Throughout the trimesters, this potential increased instability should be at the forefront of her workout programming. As a health and exercise professional, core (including pelvic) stability must be one of the main ingredients of the strength workouts you design for pregnant clients, along with offering safe and appropriate ways to progress and regress based on how her body feels in each exercise.

One of the most basic things you can do to help keep your client safe during exercise is to ensure there is a balance aid available if needed. This could be a wall, railing, tree, etc., but not you. This is increasingly important when training into her third trimester when she experiences the greatest weight distribution shift. Because every pregnancy is different (from baby to baby, mom to mom and trimester to trimester), progressions and regressions need to be planned so adjustments can be made in the moment.

In addition, relaxin doesn’t simply disappear once a baby is born. While there are differing opinions, relaxin could potentially stay in the body as long as 12 months postpartum. Therefore, you must continue to keep joint instability in mind when designing a client’s strength-training programming within her first year as a new mom.

The following three compound exercises can help create stability in a woman’s shifting body during pregnancy and postpartum:

Lat Pull With a Traveling Plié Squat (side to side)

Begin standing with feet hip-width apart and a resistance band overhead and slightly in front of the body. Step into a plie squat, and pull the band toward the chest with the hands drawing away from each other. Return to standing and repeat on the opposite side.

Regression for instability: Decrease the depth of the plié and/or loosen the band to provide less resistance.

Progression to challenge balance (if desired): Come up out of the plié and draw a knee up to create a balance challenge, and/or choke up on the band to create more resistance.

Mid Row With Alternating Reverse Lunge

Anchor the resistance band in front at chest height. Step back into a lunge as the arms pull into a row, squeezing the shoulder blades together. Return to standing and repeat on the opposite leg.

Regression for instability: Decrease the depth of the lunge and/or loosen the band to provide less resistance.

Progression to challenge balance (if desired): Come up out of the lunge and draw a knee up to create a balance challenge, and/or choke up on the band to create more resistance.

Rear Deltoid Fly With a Lateral Lunge

Begin standing with feet hip-width apart and a resistance band in front of the body at about chest height. Step into a lateral lunge and pull the band toward the chest with the hands drawing away from each other. Return to standing and repeat on the opposite leg.

Regression for instability: Decrease the depth of the lunge and/or loosen the band to provide less resistance.

Progression to challenge balance (if desired): Come up out of the lunge and draw a knee up to create a balance challenge, and/or choke up on the band to create more resistance.

Female Lumbo-Pelvic Complex 101

https://acewebcontent.azureedge.net/expert-articles/2018/04/2018-02-26-female_lumbo-perlvic_complex.jpg


May is Women’s National Health Month and is a time to focus on many aspects of health, from women’s fitness to mental and emotional well-being. Women are a powerful force of influence and change in their communities and families. For this reason, a women’s modeling of her own health can have a profound impact on all those around her, including her children and possibly even generations to come.

As health and exercise professionals, we can help the women in our communities have a better understanding of how their bodies change over their lifetimes and then train them appropriately. One area of change is within a woman’s lumbo-pelvic complex, which is the area of the low back and pelvis. While both men and women contain the same musculoskeletal anatomy, a woman’s body experiences significantly more change throughout her lifetime.

Simply put, the muscular system is the “armor” that either holds the skeletal structure in or out of alignment. If the muscular system becomes compromised (e.g., if the tension/length ratio gets skewed), the body’s skeletal structures can be pulled out of alignment, causing muscle fatigue and pain. This prolonged malalignment can also cause compensations elsewhere in the body, which can lead to issues over time. Understanding the times of life when change can occur in a woman’s body is the first step to training her effectively. Here are three life stages during which the most profound changes occur: pregnancy, postpartum and perimenopause.

Pregnancy: As pregnancy progresses, a woman’s body continues to shift, potentially causing her skeletal structure to be pulled out of neutral alignment. With the presence of the hormone relaxin, which causes ligamentous laxity, the skeletal shifts become even more profound as the weight redistribution pulls her pelvis and low back anteriorly.

Postpartum: The body that changed and shifted during her pregnancy remains after the baby is born. Additionally, she also has the challenge of caring for another human being. The increasing asymmetrical load (i.e., her baby) that she carries almost all day will pull her even more out of alignment. She is still adjusting or responding to relaxin postpartum, as it can stay in the body up to 12 months after delivery.

Perimenopause: This phase in life brings a drop in estrogen, among other things, which can affect muscle tone. The potential malalignment of her pelvis at her low back, coupled with a reduction in muscle tone, means that issues like low-back pain and stress urinary incontinence are more likely to occur.

While the issues described here only begin to describe the changes a woman’s body is likely to experience over her lifetime, it is critical for health and exercise professionals to gain a deep understanding of the female lumbo-pelvic complex. As a woman progresses through life, this understanding will be needed for her to gain the best benefits of thoughtful exercise programming.

Yoga for Breast Cancer Survivors

https://acewebcontent.azureedge.net/blogs/2019-HL_10_01_YogaforBreastCancerSurvivors-Header.jpg


Yoga has become a popular activity in the United States, with approximately 13.2% of the adult population reporting that they have practiced yoga at some point during their lives (Cramer et al., 2016). The most commonly reported  reasons for participating in yoga include maintenance of health and wellness, disease prevention, improvement in energy levels, increased immune function and management of conditions such as back pain, stress and arthritis (Cramer et al., 2016). In addition to the general population, there is a growing body of evidence to support participation in yoga for breast cancer survivors.

Breast cancer survivors can experience negative side effects from cancer treatments, including losses in strength, physical function and fatigue (Sehl et al., 2013; Simonavice et al., 2011; Stasi et al., 2003). In addition, swelling, weakness and pain in the affected arm (the arm on the side where the cancer was present) may persist following surgery, radiation and the removal of lymph nodes under the arm (Warmuth et al., 1998). These changes can negatively impact overall quality of life.

However, research has shown that practicing yoga can be beneficial in reducing some of these treatment-related side effects. Studies have reported improvements in physical well-being (Moadel et al., 2007), fatigue (Bower et al., 2012; Moadel et al., 2007), affected arm symptoms (Andysz et al., 2014) and quality of life (Andysz et al., 2014; Culos-Reed et al., 2006) following short-term yoga interventions. In addition, a systematic review and meta-analysis that included 13 yoga interventions in cancer patients concluded that yoga resulted in positive effects on distress and anxiety as well as moderate improvements in fatigue, health-related quality of life, emotional function and social function (Buffart et al., 2012).

Special Considerations for Postures and Class Sequencing

A specific yoga program that is optimal for breast cancer patients and survivors has not been determined, as the yoga interventions implemented in the aforementioned studies varied in frequency, intensity, sequencing and selected postures. Therefore, when determining the appropriate frequency and intensity, and selecting postures for your breast cancer participants, there are several considerations to keep in mind:

  • Arm Symptoms: Participants may experience pain, weakness and decreased range of motion in the affected arm as a result of cancer treatments, and the development of lymphedema, which can occur from an accumulation of lymph fluid in the arm (Sakorafas et al., 2006). Encourage participants to wear compression sleeves and to avoid any postures that result in arm pain. Initially, focus on increasing range of motion of the upper body with gentle shoulder stretches and chest-opening postures such as shoulder rolls, cactus arms, cow pose or a supported backbend. For strengthening exercises, provide modifications for postures that place a high percentage of the body weight into the arms, such as downward-facing dog, plank or low push-up position, until participants build strength in the upper body. Gradually progress as arm range of motion, strength and confidence improve.
  • Peripheral Neuropathy: Peripheral neuropathy is a side effect of chemotherapy and can result in hand and foot numbness, muscle weakness and loss of balance (Wickham, 2007). Encourage participants with peripheral neuropathy to use a chair or stand close to the wall while performing standing or balance postures. If available, a chair yoga class may also benefit these participants.
  • Include Meditation and Breathing: Be sure to incorporate both meditation and breathing exercises in your yoga classes and sessions, as both can be helpful in improving sleep, reducing stress and anxiety, managing pain and improving overall quality of life for your participants.
  • Incorporate Postures for Strength and Physical Function: Because breast cancer treatments can result in losses in strength and physical function, focus on implementing postures and sequences that incorporate whole-body functional movements to build core stability and increase strength in the upper and lower body. Postures such as warrior I, warrior II, warrior III, high lunge, goddess, downward-facing dog and plank can promote whole-body strength and function
  • Emphasize the Benefits of Each Posture: Educate your participants about the overall benefits of yoga and how breathing, meditation and the practice of specific postures can improve treatment-related side effects such as muscle weakness, pain, reduced shoulder flexibility, stress or anxiety. This can provide participants with the knowledge and confidence to perform these postures at home to help manage these side effects.
In addition to the special considerations above, teaching a yoga class for cancer patients or survivors requires additional knowledge and expertise. Therefore, if you are looking to teach or implement a cancer-specific yoga class at your facility, seek out additional cancer-specific yoga teacher trainings or become a Cancer Exercise Specialist through the American Council on Exercise.

5 Basic Yoga Modifications to Get Clients Affected by Obesity Started

Individuals who have physical limitations associated with obesity may perceive yoga to be intimidating, uncomfortable and even impossible to attempt. However, in reality, the benefits of a yoga practice are available to every body shape and size.

The primary benefits of yoga include strengthening, improved flexibility, and both physical and emotional balance.  Additional potential benefits include better posture, improved cardiovascular health and circulation, heightened focus, and more positive self-esteem and outlook. Many yoga teachers go to lengths to emphasize that a yoga practice is all about showing up and trying your best. Breathing and holding the postures as best you can is what strengthens a practice—not the number of twists in your physical pretzel.

There are a number of ways you can make yoga easier and more approachable for your clients who inhabit larger bodies, whether you are using yoga as a warm-up, teaching yoga classes or encouraging your clients to practice yoga on their own.  By introducing clients to yoga in a physically and emotionally safe manner, you can open a world benefits to clients who might not be inclined to try it on their own.  

Here are a few modifications you can offer clients impacted by obesity so that they can enjoy the benefits of yoga without stress or intimidation.

Ditch Hip-width Distance

It is very common for yoga poses to begin with the instruction: “Place your feet hip-width distance apart.” For clients impacted by obesity, however, this seemingly simple start may be complicated and fraught. Because placing feet at hip-width distance might not offer enough room for larger thighs, that particular instruction can create discomfort and instability.  Here is a modification to ease comfort and buttress balance: Replace the cue “stand hip-width distance” with “Place your feet a comfortable distance apart from each other so that you are standing with stability.”

Utilize Standing Poses

It can be difficult for clients impacted by obesity to easily move up and down off the floor.  For that reason, plan initial yoga poses to be standing ones, which will provide a friendly introduction. Mountain pose, tree pose and the beginning warrior poses are all excellent ways to begin a yoga practice, and allow room to grow and deepen as a yoga practitioner.

For clients impacted by obesity, it is important to utilize standing twists, because twisting on the floor might not be easily accessible without discomfort.  Supine Spinal Twist and Seated Spinal Twist are two common floor twists that can be easily replaced by standing poses offering the same twisting motion. Twisted Goddess and Revolved Side Angle poses are both easily accessible standing twists.

Forsake Forward Folds

Forward folds might not be accessible to clients who carry a lot of weight around their abdomen, and asking them to perform these bends can create discomfort and poor balance.  Instead, consider folds as more of a movement outward than a movement downward. The hamstrings and lower back will get the same stretching and strengthening as the upper body hinges at the hip. In fact, “hinge at the hip” is an appropriately modified cue for “fold forward.” A client impacted by obesity may wind up hinging at closer to a 90-degree angle than reaching for the floor, but can enjoy similar physical benefits.

Using props can help modify forward-bending movements and ensure balance.  For example, if Downward-facing Dog is inaccessible to your client, offer a chair for the hands. In this modified Downward Dog, your client can reach approximately halfway down and still get the same sensation up the back of the legs and in the lower back.  

Hands Interlocked

Because of different body size ratios, asking clients impacted by obesity to “interlock their hands behind their back” may cause pain, stress or simply be impossible. Instead of asking for that, cue clients to “reach backward while moving the shoulder blades toward each other.” Eliminating the expectation of the hands meeting will give your client a safer and more comfortable position, while still opening the chest and working the shoulders and arms.

Modify the Exercise Environment

As with all exercises that are new, you want to make sure your client feels physically safe and emotionally supported. If your client expresses concern about participating in yoga, it may be beneficial to open up a frank conversation about what would make him or her feel the most comfortable. Approach the conversation with an openness to any barriers he or she might perceive and some ideas about what might possibly create an environment that would allow for a positive yoga experience.

If your clients are looking to deepen their yoga practice outside of the scope of your training, help them consider the following in order to have a positive environment:

  • Many yoga studios offer classes for larger bodies, which guarantees a teacher equipped with appropriate modifications. If that isn’t available, make sure your client finds a teacher who is knowledgeable of the pertinent issues. Ensure your clients that it is appropriate to call a yoga studio and ask about the experience of the teachers.
  • Some clients would rather practice alone until they feel more comfortable. There are numerous online resources and videos dedicated to yoga specifically for people impacted by obesity. Becoming comfortable with their own modifications prior to joining a class means they won’t have to entirely rely on the instructor’s cues.

Barre for everyone (total body workout)

This is a barre workout that anyone can do, using only a pair of dumbbells. It’s a great bodyweight endurance workout to strengthen muscles, burn fat, and challenge your body in an entirely different way.  

Hi friends! How are ya? Hope you’re enjoying the morning so far. Today I have a podcast interview, am lifting some weights (arms from Lean Machine) and spending the rest of the day outside with the girls. I’d love to hear what you have going on!

For today’s workout, I have a new barre workout for ya. I have to admit, it was so much fun (and kind of ridiculous) taking these pics on the gorgeous steps at La Encantada.

Barre for everyone total body workout

(Wearing Fabletics tights and lululemon tank)

This workout combines some of my favorite classic barre moves with endurance strength work using light dumbbells. The dumbbells may look small at first, but I promise that they burn after verrryyy quickly. (As always, check with a doctor before making any fitness changes. Honor your body and modify if needed. Barre works well for many populations, but isn’t always a great option for those who have knee or hip considerations.)

Here’s what the workout looks like:

Barre for everyone total body strength workout

Form cues and tips:

Barre for everyone workout:

Lunge left with pulse: for your lunge, make sure to watch your front knee and keep it stacked right over your front ankle. Come down to your lowest point and pulse here.

Lunge leg lift: next, you’ll move into full range lunges with a leg lift. Squeeze your glutes to lift your leg, and keep your core tight and toe pointed.

Hip extension pulse: hold your leg high and start to pulse at the highest point, squeezing your glutes to lift your leg. (Think about using glute strength instead of momentum.)

Extension

Tiny toe circles: hold your leg high and draw a circle with your toe- 20 circles in each direction.

Side leg lift pulses: open to the side, keep your core engaged, and flex your foot. From here, pulse up 20 times.

Plie squat with heels lifted: find your lowest point and make sure to keep your hips tucked under and your shoulders back and down.

Flare: hold your knees wide and then “flare” — pushing your knees open. (Make sure you’re engaging your glutes to move your legs.)

Flare copy

Hold: hold your lowest point! Keep your heels high and find your lowest, shaky point.

Strength Endurance:

Chest press: Hold the weights at 90 degrees. Squeeze your chest to bring the weights in, open back up, then press the weights overhead.

90 degree pulses: Hold the weights at 90 degrees and pulse up.

Plie squat and overhead reach: Come into a plie squat and use your back muscles to squeeze the weights behind you. Rise from your squat (squeeze your quads) and press the weights up overhead.

Gina Harney Favorites 0036

Triceps extension: Hinge forward from your hips and keep your core pulled in. Squeeze the weights in, bringing your arms close to your torso, then extend your arms behind you. Think about really squeezing the backs on your arms as you extend. Complete full range extensions, 20 pulses at the top, and then hold for 20 seconds at your highest, straightest point.


Cardio Barre Workout

The cardio barre workout will get your heart rate up and burn serious calories. You can do this workout at home or at the gym! All you need is your own bodyweight and a timer.

Hey friends! How are you? I hope you’re having a great morning so far. Today, I’m doing a couple of fitness consultation calls (wahoo!), putting the finishing touches on tomorrow’s podcast episode, and catching a strength workout at the gym. Lately, I’ve been focused on adding strength variety to my routine: heavy lower rep work at Telos, moderate rep and intensity at Orangetheory, and low weight, higher rep endurance work through BODYPUMP, Peloton, and Barre.

Mtn climber

I found that I get the most benefits from my efforts when I include a mix of traditional hypertrophy work and endurance work. My muscles look and feel different, and it always keeps me challenged! (You can read more about the difference between traditional strength and endurance here.) As you guys know, I’m a huge fan of barre, but one of the top complains I hear about barre is that it doesn’t include very much cardio. Participants often like to go to classes for a calorie burn, and with barre, it can be fairly low. (The good news is that when you take a class, you FEEL it working, so it must be magical even though my Apple Watch doesn’t give it enough credit.) Many barre classes and studios have incorporated more variety in their classes, whether it’s through core and cardio-focused classes, or fusion classes that include spin bikes or Pilates reformers. I like it all. 😉 

My Other Videos

If you’re looking for a barre workout that will get your heart rate up, I got you, boo. This one includes some of my very favorite heart-pumping barre intervals. You can also keep the moves low impact by eliminating any of the jumps. You’ll still get an awesome workout!

Here’s what the Cardio Barre Workout looks like:

Cardio barre workout you can do at home! All you need is your own bodyweight and a timer to get in an awesome calorie-blasting workout.  fitnessista.com

Form cues and tips:

Marches: March in place, using your core to lift your legs and exhaling as each leg rises. Pull your arms down with each march, engaging your lats. The goal is to get your legs as high as your hip bones, as straight as possible, and toes pointed. 

Cardio barre workout you can do at home! All you need is your own bodyweight and a timer to get in an awesome calorie-blasting workout.  fitnessista.com

Low plie squat pulse: For this squat variation, you’ll take a SUPER wide stance and turn your toes out. As you sink down, keep your chest lifted and endeavor to get your thighs parallel to the floor. Make sure your knees extend towards your toes but not past your toes. Hold your squat here, with arms extended out to the sides, and pulse up two inches and down two inches the entire time.

Rotating squat jumps: Start facing one side and sink low into a squat. Jump 180 degrees, and land with a soft knee to squat on the opposite side. To minimize impact, walk 180 degrees to squat on the other side.

Mountain climbers: Get in plank position with your wrists under your shoulders. Bring one knee towards the elbow on the same side. Move back to plank and switch to the opposite side. For more of a challenge, move as quickly as possible.

Plie squat burpees: Sit into your plie squat and bring both hands to the floor, firmly planting your entire hand. Walk or hop back to a plank position (push-up here optional), walk or hop your feet back to your hands, and jump vertically, raising your arms overhead.

Cardio barre workout you can do at home! All you need is your own bodyweight and a timer to get in an awesome calorie-blasting workout.  fitnessista.com

Touch the floor and passé: Stand with legs hip-width apart, bend at the hips to touch the floor as one leg lifts up behind you. Return to standing, bending the knee and driving it forward. Repeat all reps on one side before switching.

Plie squat jumps: Get into a plie squat position (feet wide and booty LOW), and touch the floor. Keep your abs engaged and chest lifted. Powering through your heels, spring up, reaching your arms towards the ceiling. Land with a soft knee. Repeat.

Cardio barre workout you can do at home! All you need is your own bodyweight and a timer to get in an awesome calorie-blasting workout.  fitnessista.com

Side lunge to passé: Try to keep your chest lifted and core tight as you perform the exercise. Aim for some dynamics and height change with your movements, as this will make the exercise even more challenging. As you rise from the side lunge, bring that leg to a bend position with arms in front. Spring up from your bottom leg and land softly.

5 Ways to Reduce Muscle Soreness FAST

Okay, can we talk about having muscle soreness after a workout for a minute? I have a love-hate thing here. On the one hand, I love being sore after a good, hard workout like this one with booty bands or this one (sooo good!) It’s super satisfying to literally feel my muscles building themselves.

On the other, I get bummed when I’m so sore that getting my sweat on sounds extra hard. I’m definitely all for working out through some slight soreness, especially if you’re targeting a different muscle group. But sometimes, the extra ache can be enough to make me want to slow my roll.

But it’s swimsuit season, babes! And you’ve all worked so hard to make so much progress. A little muscle soreness after a workout should never stand in our way. So here are my top five fave ways to reduce muscle soreness — and fast!

#1: Give yourself a massage

There’s just something about a massage, right? It feels soooo good. But I’ve always hated self-massage because it’s just not as relaxing. Or, at least, I used to — until I found something super cool. 

muscle soreness after a workout

You guys! I cannot say enough about the Wahl Lithium-Ion Cordless Deep Tissue Massager

For starters, this thing is so versatile and easy-to-use. It’s cordless, so I can give my sore muscles some love anywhere I want, like chilling on the couch. And it’s got four different attachment heads and variable intensity so you can really target muscle groups with what they need. Plus, the long handle and the spine attachment are a GAME CHANGER for sore back muscles.

Seriously, if you’re looking for a way to treat yourself, this massager is it

#2: Do some relaxed stretching 

Full body stretching

If your muscles are sore, they’re crying out for some TLC. And you can give it to them in the form of stretching. This is a great way to move your body on rest days. 

I’ve got some stretching routines you can follow. This one gives you a full-body stretch, while this one is awesome for relaxing your body and your mind. Plus, there are TONS of amazing stretching videos for you in the LSF App!

I’d also encourage you to explore what your body needs. If one particular area is sore, try different stretches until you find what gives you relief. Listening to your body like this is a great way to give it the love and attention it needs. 

#3: Ice, ice, baby

Muscle soreness is one thing. It’s a sign your muscles are rebuilding. But if you notice any inflammation — or swelling — it’s a sign you’ve gone too hard. Take it easy on that area, for sure.

And to bring any inflammation down, ice the area. I know ice can feel pretty intense. I recommend wrapping your ice pack in a tea towel to ease yourself in. Because, seriously, ice can be a huge part of treating a wide range of injuries

#4: Heat it up

Ice is great if you’ve strained yourself too much. But heat is ideal if you want to support your muscles in their normal recovery period — plus it feels good!

When you apply heat, whether you use a heating pad or take a hot bath, you cause blood vessels in the area to dilate. This improves blood flow, which helps bring a flood of nutrients and oxygen to the area. In short, heat’s a great tool to help yourself ease soreness and support recovery. 

#5: Plan your meals wisely

katie cooking

You already know that what you put into your body fuels it. So don’t forget that mealtime can be a powerful tool to help yourself get past muscle soreness after a workout faster. Include lots of anti-inflammatory foods in your meals and snacks when you’re feeling achy. 

Also, don’t forget to drink plenty of water with and between meals. When you’re dehydrated, muscle soreness is more painful. Drinking lots of water helps to flush toxins so you can feel 100% faster.

Don’t let soreness stop you, babe! Use these tips to keep on your grind, pain-free!

FULL BODY BAND WORKOUT

You’ll find 3 more strength based exercises with 1 more plyometric exercise in each circuit. Grab your bands and sweat it out! Find more workouts just like this plus bonus sweats and videos in the LSF App and try out these booty moves for your next workout to build that peach!

Need some post workout fuel? Try out this delish Instapot Chicken Tacos recipe for dinner tonight!

Complete each circuit 2 times.

CIRCUIT 1

Sumo Squat x15

Start with the band around your thighs just above your knees. Place your feet wider than hip distance and your heels facing in and your toes pointed slightly out. Keep your body weight in your heels with your chest lifted and core tight. Sit your hips back and down as you lower into a “seated” position. Pushing into the band,  bring your hips down in line with your knees. Push through your heels and squeeze your glutes to come back to standing. Repeat.

Pull Downs x10 each side

Start by holding the bands in both hands overhead. Pull your shoulders back and down, tuck your pelvis, and engage your core. Exhale and pull down on the right side, driving your elbow down and squeezing your shoulder blades together. Inhale and you return to the starting position and do the same on the left. Repeat. 

Russian Twists x30

Begin in a side forearm plank with shoulders stacked over the elbow and resistance band around the thighs just about the knees. Engage your core and drive your upper knee toward your chest as you reach your arm and pull your elbow to meet the knee in the middle. Repeat. 

Frog Hops x15

Start in a sumo squat position with the band around your thighs and hands on the floor. Explode, jumping up with hands overhead, and land softly back in your squat. Repeat, moving as quickly as possible.

CIRCUIT 2


Clams x16 each side

Come onto your side with your knees bent and the band around your thighs.  Keep your ankles together as you press into the band to open your knees working your abductors. Slowly close with control and repeat. 

Bicep Curls x12 each side

Start with the band in both hands and your feet hip distance apart. Keep your body weight in your heels and a slight bend in your knees.. With straight arms, bring your hands together in front of you. Start with your right hand facing away from your body and your left facing your thigh. Engage your right side and curl the band up toward your shoulder. Squeeze at the top and slowly lower with control. Repeat this same movement on the left and alternating sides.

Single Arm Row x12 each side

Start with the band in both hands and your feet hip distance apart. Keep your body weight in your heels and hinge forward slightly. With straight arms, bring your hands together in front of you. Then with your palms facing each other, pull your right elbow back keeping it close to your body. Squeeze the shoulder blades together, pause and return to starting position. Repeat.

Mountain Climbers x40

Start in a full plank position with the band around your thighs, just above your knees. Drive your right knee toward your left elbow then step back to starting. Repeat with your left knee to right elbow and try to move from left to right as quickly as possible

CIRCUIT 3

Dead Lifts x15

Start with the band around the bottom of your feet, feet hip distance apart. Bend into your knees and hinge forward with a flat back to gather the band in your hands. Engage your glutes as you lift to standing squeezing your glutes and hamstrings at the top. Note: you will not likely be able to return to full upright position with the band in hands. Keep a bend in your knees and remain slightly hinged at the top depending on the band you use. 

Tricep Kickbacks x12 each side

Start with your band in both hands and  your feet hip distance apart. Keep your body weight in your heels and hinge forward slightly. Place your left hand with the band onto your right hip. Drive the elbow of your right arm toward the sky, keep your right hand on your hip.. Keep your upper arm stable as you press your band back and up to straighten your arm. Bend to lower the bandt to your hip and try not to go past your hip! Repeat.

Bicycles x40

Lay on your back with the band around your thighs and just above your knees. Bring your hands gently behind your head with your elbows out wide. Bend your knees to a 90 degree angle and engage your core. Lift your shoulders off the mat and extend your left leg out long to hover as you twist your right elbow to your left knee. Switch sides and continue alternating right to left.

Plank to squat x12

Start in full plank position with band around your thighs and legs slightly wider than hip-width apart. Hop your feet toward your hands. When your feet reach your hands, bring your weight into your heels and continue to press into the band. Lift your chest to lift into a squat position. Plank your hands back down, hop your feet back and repeat